源碼解讀Spring-Integration執(zhí)行過程
Spring-Integration基于Spring,在應(yīng)用程序中啟用了輕量級(jí)消息傳遞,并支持通過聲明式適配器與外部系統(tǒng)集成。這一段官網(wǎng)的介紹,概況了整個(gè)Integration的用途。個(gè)人感覺消息傳遞是真正的重點(diǎn)。

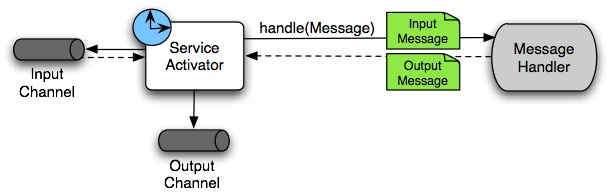
如上圖所示,典型的生產(chǎn)者-消費(fèi)者模式,中間通過一個(gè)特定的通道進(jìn)行數(shù)據(jù)傳輸,說到這,是不是隱隱感覺到queue的存在。確實(shí)事實(shí)上這個(gè)所謂的通道默認(rèn)就是用的 blockingqueue。
Spring-Integration網(wǎng)上的資料是真少,再加上源碼分析的是更少。關(guān)于Spring-Integration的基本介紹直接去官網(wǎng)上看更加的直觀,這邊就不累述了。
今天主要是看個(gè)簡單的hello word進(jìn)來分析下整個(gè)執(zhí)行過程。
先看下代碼:
<?xml version='1.0' encoding='UTF-8'?><beans:beans xmlns='http://www.springframework.org/schema/integration'xmlns:xsi='http://www.w3.org/2001/XMLSchema-instance'xmlns:beans='http://www.springframework.org/schema/beans'xsi:schemaLocation='http://www.springframework.org/schema/beanshttps://www.springframework.org/schema/beans/spring-beans.xsdhttp://www.springframework.org/schema/integrationhttps://www.springframework.org/schema/integration/spring-integration.xsd'><annotation-config/><channel ><queue/></channel><beans:bean /></beans:beans>
@Configurationpublic class Beans { @ServiceActivator(inputChannel = 'ic', outputChannel = 'oc') public String sayHello(String name) {return 'Hello ' + name; }}
public class HelloWorldDemo { @Test public void testDemo() throws Exception {ClassPathXmlApplicationContext context =new ClassPathXmlApplicationContext('/demo.xml', HelloWorldDemo.class);DirectChannel inputChannel = context.getBean('ic', DirectChannel.class);PollableChannel outputChannel = context.getBean('oc', PollableChannel.class);inputChannel.send(new GenericMessage<String>('World'));System.out.println('==> HelloWorldDemo: ' + outputChannel.receive(0).getPayload());context.close(); }}out:==> HelloWorldDemo: Hello World二,ServiceActivator
上面的代碼演示了調(diào)用方法的入站通道適配器和標(biāo)準(zhǔn)的出站通道適配器, 它們之間是一個(gè)帶注解的ServiceActivator。關(guān)于這個(gè)ServiceActivator就是一個(gè)消息端點(diǎn)。
消息端點(diǎn)的主要作用是以非侵入性方式將應(yīng)用程序代碼連接到消息傳遞框架。換句話說,理想情況下,應(yīng)用程序代碼應(yīng)該不知道消息對(duì)象或消息管道。這類似于 MVC 范式中controller 的作用。正如controller 處理 HTTP 請(qǐng)求一樣,消息端點(diǎn)處理消息。以及controller 映射到 URL 模式一樣,消息端點(diǎn)映射到消息通道。這兩種情況的目標(biāo)是相同的。
ServiceActivator是用于將服務(wù)實(shí)例連接到消息傳遞系統(tǒng)的通用端點(diǎn)。必須配置輸入消息通道,如果要調(diào)用的服務(wù)方法能夠返回值,還可以提供輸出消息通道。
具體流程如下圖:
上面的代碼比較簡單,但是或許會(huì)發(fā)現(xiàn)我們只定義了輸出通道oc,輸入通道ic竟然沒有定義也能正常應(yīng)用,是不是很奇怪?帶著疑問我們先看下ServiceActivator的源碼:
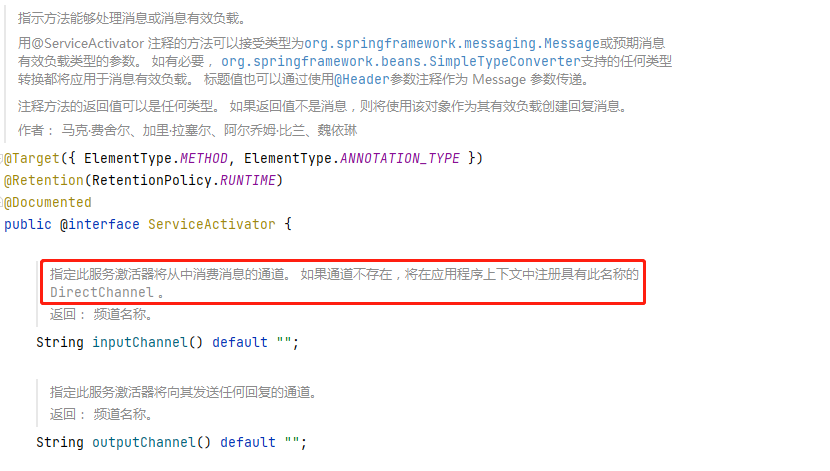
注釋上寫的很清楚,如果輸入通道不存在,將在應(yīng)用程序上下文中注冊(cè)具有此名稱的DirectChannel 。具體在哪定義,我們后面會(huì)看到,現(xiàn)在不急,先一步步來看他的執(zhí)行過程。
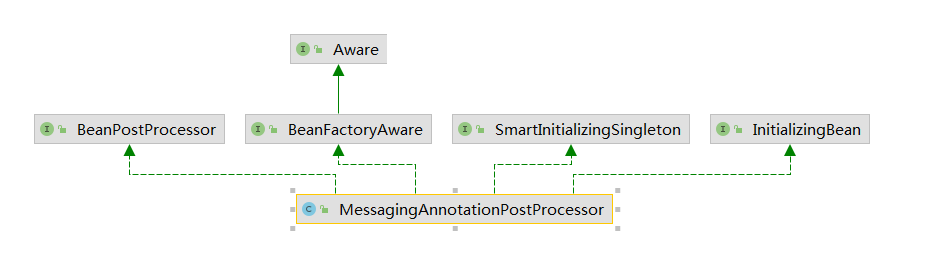
我們?nèi)植檎襍erviceActivator,看他是哪邊進(jìn)行處理的,最后發(fā)現(xiàn)了MessagingAnnotationPostProcessor類,用來處理方法級(jí)消息注解的BeanPostProcessor實(shí)現(xiàn)。
@Overridepublic void afterPropertiesSet() {Assert.notNull(this.beanFactory, 'BeanFactory must not be null');((BeanDefinitionRegistry) this.beanFactory).registerBeanDefinition(IntegrationContextUtils.DISPOSABLES_BEAN_NAME,BeanDefinitionBuilder.genericBeanDefinition(Disposables.class, Disposables::new).getRawBeanDefinition());this.postProcessors.put(Filter.class, new FilterAnnotationPostProcessor(this.beanFactory));this.postProcessors.put(Router.class, new RouterAnnotationPostProcessor(this.beanFactory));this.postProcessors.put(Transformer.class, new TransformerAnnotationPostProcessor(this.beanFactory));this.postProcessors.put(ServiceActivator.class, new ServiceActivatorAnnotationPostProcessor(this.beanFactory));this.postProcessors.put(Splitter.class, new SplitterAnnotationPostProcessor(this.beanFactory));this.postProcessors.put(Aggregator.class, new AggregatorAnnotationPostProcessor(this.beanFactory));this.postProcessors.put(InboundChannelAdapter.class,new InboundChannelAdapterAnnotationPostProcessor(this.beanFactory));this.postProcessors.put(BridgeFrom.class, new BridgeFromAnnotationPostProcessor(this.beanFactory));this.postProcessors.put(BridgeTo.class, new BridgeToAnnotationPostProcessor(this.beanFactory));Map<Class<? extends Annotation>, MethodAnnotationPostProcessor<?>> customPostProcessors =setupCustomPostProcessors();if (!CollectionUtils.isEmpty(customPostProcessors)) {this.postProcessors.putAll(customPostProcessors);}}
在afterPropertiesSet方法中,我們看到定義了一個(gè)后處理器postProcessors,里面注冊(cè)了相關(guān)的注解處理類。包含各種消息端點(diǎn)處理,除了上面寫的ServiceActivator,還有過濾器,路由,轉(zhuǎn)換器等各種不同的端點(diǎn)方法。
接著往向下看,既然實(shí)現(xiàn)了BeanPostProcessor,那必然要用到postProcessAfterInitialization方法實(shí)現(xiàn),這里的流程大概就是遍歷出包含有@ServiceActivator的bean方法,用來做后續(xù)處理。我們直接看重點(diǎn)的代碼。
Object result = postProcessor.postProcess(bean, beanName, targetMethod, annotations);三,postProcess
在AbstractMethodAnnotationPostProcessor中有個(gè)共通方法postProcess用來生成對(duì)應(yīng)的端點(diǎn)信息。具體代碼:
@Overridepublic Object postProcess(Object bean, String beanName, Method method, List<Annotation> annotations) {Object sourceHandler = null;if (beanAnnotationAware() && AnnotatedElementUtils.isAnnotated(method, Bean.class.getName())) {if (!this.beanFactory.containsBeanDefinition(resolveTargetBeanName(method))) {this.logger.debug('Skipping endpoint creation; perhaps due to some ’@Conditional’ annotation.');return null;}else {sourceHandler = resolveTargetBeanFromMethodWithBeanAnnotation(method);}}//生成對(duì)應(yīng)的MessageHandler,用來執(zhí)行對(duì)應(yīng)的注解的方法MessageHandler handler = createHandler(bean, method, annotations);if (!(handler instanceof ReactiveMessageHandlerAdapter)) {orderable(method, handler);producerOrRouter(annotations, handler);if (!handler.equals(sourceHandler)) {handler = registerHandlerBean(beanName, method, handler);}handler = annotated(method, handler);handler = adviceChain(beanName, annotations, handler);}//將MessageHandler實(shí)現(xiàn)連接到消息端點(diǎn),生成對(duì)應(yīng)的endpoint。AbstractEndpoint endpoint = createEndpoint(handler, method, annotations);if (endpoint != null) {return endpoint;}else {return handler;}}
這里面主要是兩件事:
根據(jù)模板模式中不同的createHandler抽象方法實(shí)現(xiàn),生成對(duì)應(yīng)的MessageHandler。譬如說我們這邊的ServiceActivatorAnnotationPostProcessor 將MessageHandler實(shí)現(xiàn)連接到消息端點(diǎn),生成對(duì)應(yīng)的endpoint。1.createHandler
@Overrideprotected MessageHandler createHandler(Object bean, Method method, List<Annotation> annotations) {AbstractReplyProducingMessageHandler serviceActivator;if (AnnotatedElementUtils.isAnnotated(method, Bean.class.getName())) {...else {serviceActivator = new ServiceActivatingHandler(bean, method);}String requiresReply = MessagingAnnotationUtils.resolveAttribute(annotations, 'requiresReply', String.class);if (StringUtils.hasText(requiresReply)) {serviceActivator.setRequiresReply(resolveAttributeToBoolean(requiresReply));}String isAsync = MessagingAnnotationUtils.resolveAttribute(annotations, 'async', String.class);if (StringUtils.hasText(isAsync)) {serviceActivator.setAsync(resolveAttributeToBoolean(isAsync));}//是否設(shè)置了輸出通道setOutputChannelIfPresent(annotations, serviceActivator);return serviceActivator;}
createHandler的代碼比較簡單,就是根據(jù)注解中的幾個(gè)屬性還有對(duì)應(yīng)的方法參數(shù),生成ServiceActivatingHandler。追溯下去ServiceActivatingHandler中最后會(huì)生成一個(gè)委托對(duì)象MessagingMethodInvokerHelper用來以反射的方式來執(zhí)行目標(biāo)方法。
2.createEndpoint
createEndpoint字面上都能知道是生成消息端點(diǎn),事實(shí)上也是,把生成的handler和對(duì)應(yīng)的管道進(jìn)行關(guān)聯(lián)。具體看下代碼體會(huì):
protected AbstractEndpoint createEndpoint(MessageHandler handler, @SuppressWarnings('unused') Method method,List<Annotation> annotations) {AbstractEndpoint endpoint = null;//取得注解中inputChannelName String inputChannelName = MessagingAnnotationUtils.resolveAttribute(annotations, getInputChannelAttribute(),String.class);if (StringUtils.hasText(inputChannelName)) {MessageChannel inputChannel;try {//從beanFactory中取得對(duì)應(yīng)的通道beaninputChannel = this.channelResolver.resolveDestination(inputChannelName);}catch (DestinationResolutionException e) { //取不到,則自動(dòng)注冊(cè)一個(gè)類型為DirectChannel的inputChannel if (e.getCause() instanceof NoSuchBeanDefinitionException) {inputChannel = new DirectChannel();this.beanFactory.registerSingleton(inputChannelName, inputChannel);inputChannel = (MessageChannel) this.beanFactory.initializeBean(inputChannel, inputChannelName);if (this.disposables != null) {this.disposables.add((DisposableBean) inputChannel);}}else {throw e;}}Assert.notNull(inputChannel, () -> 'failed to resolve inputChannel ’' + inputChannelName + '’');//生成endpoint endpoint = doCreateEndpoint(handler, inputChannel, annotations);}return endpoint;}
上面的代碼中,我們就能清楚的看到為什么我們?cè)赿emo中沒有注冊(cè)輸入通道也能正常應(yīng)用的原因了,從而回答之前的疑問。
protected AbstractEndpoint doCreateEndpoint(MessageHandler handler, MessageChannel inputChannel,List<Annotation> annotations) {....else if (inputChannel instanceof SubscribableChannel) {//生成SubscribableChannel類型對(duì)應(yīng)的執(zhí)行端點(diǎn)return new EventDrivenConsumer((SubscribableChannel) inputChannel, handler);}else if (inputChannel instanceof PollableChannel) {return pollingConsumer(inputChannel, handler, pollers);}else {throw new IllegalArgumentException('Unsupported ’inputChannel’ type: ’'+ inputChannel.getClass().getName() + '’. ' +'Must be one of ’SubscribableChannel’, ’PollableChannel’ or ’ReactiveStreamsSubscribableChannel’');}}
通道類型一共有兩種,一種是發(fā)布訂閱,一種是可輪詢的,我們是默認(rèn)是走的第一種,因?yàn)镈irectChannel默認(rèn)就是個(gè)SubscribableChannel。所以最終我們生成了對(duì)應(yīng)的信息端點(diǎn)類EventDrivenConsumer。
我們先看下EventDrivenConsumer整體結(jié)構(gòu):

EventDrivenConsumer上面有一個(gè)抽象類AbstractEndpoint,最上面實(shí)現(xiàn)了Lifecycle接口,所以生命周期跟著容器走,我們直接跳到star方法看:
@Overrideprotected void doStart() {this.logComponentSubscriptionEvent(true);//把handler和inputChannel進(jìn)行綁定this.inputChannel.subscribe(this.handler);if (this.handler instanceof Lifecycle) {((Lifecycle) this.handler).start();}}
@Overridepublic synchronized boolean addHandler(MessageHandler handler) {Assert.notNull(handler, 'handler must not be null');Assert.isTrue(this.handlers.size() < this.maxSubscribers, 'Maximum subscribers exceeded');boolean added = this.handlers.add(handler);if (this.handlers.size() == 1) {this.theOneHandler = handler;}else {this.theOneHandler = null;}return added;}
上面的代碼主要就是把handler注冊(cè)到inputChannel中,這樣只要inputChannel通道一收到信息,就會(huì)通知他注冊(cè)的handlers進(jìn)行處理。代碼中比較清楚的記錄了一切的操作,就不多解釋了。
四,發(fā)送信息執(zhí)行完上面一系列的注冊(cè),已經(jīng)把這一些的通道打通了,剩下的就是真正的發(fā)送操作了。下面分析下inputChannel.send(new GenericMessage<String>('World'));看看send操作:
/** * 在此頻道上發(fā)送消息。 如果通道已滿,則此方法將阻塞,直到發(fā)生超時(shí)或發(fā)送線程中斷。 如果指定的超時(shí)時(shí)間為 0,則該方法將立即返回。 如果小于零,它將無限期阻塞(請(qǐng)參閱send(Message) )。 * 參數(shù): * messageArg ? 要發(fā)送的消息 * timeout - 以毫秒為單位的超時(shí)時(shí)間 * 返回: * true如果消息發(fā)送成功, false如果消息無法在規(guī)定時(shí)間內(nèi)發(fā)送或發(fā)送線程被中斷 */@Override public boolean send(Message<?> messageArg, long timeout) {...try {//message是否需要轉(zhuǎn)換message = convertPayloadIfNecessary(message);//發(fā)送前攔截器if (interceptorList.getSize() > 0) {interceptorStack = new ArrayDeque<>();message = interceptorList.preSend(message, this, interceptorStack);if (message == null) {return false;}}if (this.metricsCaptor != null) {sample = this.metricsCaptor.start();}//發(fā)送操作sent = doSend(message, timeout);if (sample != null) {sample.stop(sendTimer(sent));}metricsProcessed = true;if (debugEnabled) {logger.debug('postSend (sent=' + sent + ') on channel ’' + this + '’, message: ' + message);}//發(fā)送后攔截器if (interceptorStack != null) {interceptorList.postSend(message, this, sent);interceptorList.afterSendCompletion(message, this, sent, null, interceptorStack);}return sent;}catch (Exception ex) {...}}
真正的send操作跟下去,會(huì)發(fā)現(xiàn)層次極深,礙于篇幅,我們直接跟到重點(diǎn)代碼:
@Overrideprotected final void handleMessageInternal(Message<?> message) {Object result;if (this.advisedRequestHandler == null) {//反射執(zhí)行對(duì)應(yīng)的端點(diǎn)方法result = handleRequestMessage(message);}else {result = doInvokeAdvisedRequestHandler(message);}if (result != null) {//往outputChannel發(fā)送執(zhí)行結(jié)果 sendOutputs(result, message);}...}
handleRequestMessage的操作就是用之前我們handler中的委托類MessagingMethodInvokerHelper去反射運(yùn)行對(duì)應(yīng)的端點(diǎn)方法,然后把執(zhí)行結(jié)果發(fā)送outputChannel。最后我們直接定位到具體的發(fā)送操作:
@Overrideprotected boolean doSend(Message<?> message, long timeout) {Assert.notNull(message, '’message’ must not be null');try {if (this.queue instanceof BlockingQueue) {BlockingQueue<Message<?>> blockingQueue = (BlockingQueue<Message<?>>) this.queue;if (timeout > 0) {return blockingQueue.offer(message, timeout, TimeUnit.MILLISECONDS);}if (timeout == 0) {return blockingQueue.offer(message);}blockingQueue.put(message);return true;}else {try {return this.queue.offer(message);}finally {this.queueSemaphore.release();}}}catch (InterruptedException e) {Thread.currentThread().interrupt();return false;}}
看到這,我們就明白了數(shù)據(jù)的去向,存儲(chǔ)在隊(duì)列里了,生產(chǎn)者產(chǎn)生的數(shù)據(jù)就已經(jīng)生成了,所以發(fā)送的操作基本上就告一段落了。
五,接收信息數(shù)據(jù)已經(jīng)生成,后面就是看如何消費(fèi)操作了,下面分析下 outputChannel.receive(0).getPayload()操作:
/** * 從該通道接收第一條可用消息。 如果通道不包含任何消息,則此方法將阻塞,直到分配的超時(shí)時(shí)間過去。 如果指定的超時(shí)時(shí)間為 0,則該方法將立即返回。 如果小于零,它將無限期阻塞(參見receive() )。 * 參數(shù): * timeout - 以毫秒為單位的超時(shí)時(shí)間 * 返回: * 如果在分配的時(shí)間內(nèi)沒有可用的消息或接收線程被中斷,則為第一個(gè)可用消息或null 。 */@Override // NOSONAR complexity@Nullablepublic Message<?> receive(long timeout) {...try {//接受前攔截器操作if (interceptorList.getSize() > 0) {interceptorStack = new ArrayDeque<>();//一旦調(diào)用接收并在實(shí)際檢索消息之前調(diào)用if (!interceptorList.preReceive(this, interceptorStack)) {return null;}}//接收操作Message<?> message = doReceive(timeout);...//在檢索到 Message 之后但在將其返回給調(diào)用者之前立即調(diào)用。 必要時(shí)可以修改消息if (interceptorStack != null && message != null) {message = interceptorList.postReceive(message, this);}//在接收完成后調(diào)用,而不管已引發(fā)的任何異常,從而允許適當(dāng)?shù)馁Y源清理interceptorList.afterReceiveCompletion(message, this, null, interceptorStack);return message;}catch (RuntimeException ex) {...}}
最后的doReceive操作,其實(shí)大家都心知肚明了,就是從上面的隊(duì)列中直接讀取數(shù)據(jù),代碼比較簡單,就不注釋了:
@Override@Nullableprotected Message<?> doReceive(long timeout) {try {if (timeout > 0) {if (this.queue instanceof BlockingQueue) {return ((BlockingQueue<Message<?>>) this.queue).poll(timeout, TimeUnit.MILLISECONDS);}else {return pollNonBlockingQueue(timeout);}}if (timeout == 0) {return this.queue.poll();}if (this.queue instanceof BlockingQueue) {return ((BlockingQueue<Message<?>>) this.queue).take();}else {Message<?> message = this.queue.poll();while (message == null) {this.queueSemaphore.tryAcquire(50, TimeUnit.MILLISECONDS); // NOSONAR ok to ignore resultmessage = this.queue.poll();}return message;}}catch (InterruptedException e) {Thread.currentThread().interrupt();return null;}}六,結(jié)語
能堅(jiān)持看到這的,基本上都是勇士了。這一系列的執(zhí)行過程其實(shí)還是比較繞的,我估計(jì)有些人看得也是云里霧里。其實(shí)我已經(jīng)盡量精簡了許多,Spring-Integration其實(shí)涉及到的應(yīng)用分支更多,我這也只是十分基礎(chǔ)的東西,我只能把我自己知道的先記錄下來。如果讓你對(duì)Spring-Integration產(chǎn)生了興趣,那本文的目的就達(dá)到了。這需要你自己去實(shí)地操作研究下,總是有收獲的。
以上就是源碼簡析Spring-Integration執(zhí)行流程的詳細(xì)內(nèi)容,更多關(guān)于Spring Integration執(zhí)行的資料請(qǐng)關(guān)注好吧啦網(wǎng)其它相關(guān)文章!
相關(guān)文章:
1. Python的Tqdm模塊實(shí)現(xiàn)進(jìn)度條配置2. WML語言的基本情況3. 刪除docker里建立容器的操作方法4. react axios 跨域訪問一個(gè)或多個(gè)域名問題5. python 實(shí)現(xiàn)rolling和apply函數(shù)的向下取值操作6. CSS Hack大全-教你如何區(qū)分出IE6-IE10、FireFox、Chrome、Opera7. 淺談python多線程和多線程變量共享問題介紹8. python利用platform模塊獲取系統(tǒng)信息9. Python 多線程之threading 模塊的使用10. CSS代碼檢查工具stylelint的使用方法詳解

 網(wǎng)公網(wǎng)安備