Springboot+SpringSecurity+JWT實現(xiàn)用戶登錄和權(quán)限認(rèn)證示例
如今,互聯(lián)網(wǎng)項目對于安全的要求越來越嚴(yán)格,這就是對后端開發(fā)提出了更多的要求,目前比較成熟的幾種大家比較熟悉的模式,像RBAC 基于角色權(quán)限的驗證,shiro框架專門用于處理權(quán)限方面的,另一個比較流行的后端框架是Spring-Security,該框架提供了一整套比較成熟,也很完整的機(jī)制用于處理各類場景下的可以基于權(quán)限,資源路徑,以及授權(quán)方面的解決方案,部分模塊支持定制化,而且在和oauth2.0進(jìn)行了很好的無縫連接,在移動互聯(lián)網(wǎng)的授權(quán)認(rèn)證方面有很強(qiáng)的優(yōu)勢,具體的使用大家可以結(jié)合自己的業(yè)務(wù)場景進(jìn)行選取和使用
下面來說說關(guān)于單點登錄中目前比較流行的一種使用方式,就是springsecurity+jwt實現(xiàn)無狀態(tài)下用戶登錄;
JWT
在之前的篇章中大致提到過,使用jwt在分布式項目中進(jìn)行用戶信息的認(rèn)證很方便,各個模塊只需要知道配置的秘鑰,就可以解密token中用戶的基本信息,完成認(rèn)證,很方便,關(guān)于使用jwt的基本內(nèi)容可以查閱相關(guān)資料,或者參考我之前的一篇;
整理一下思路
1、搭建springboot工程2、導(dǎo)入springSecurity跟jwt的依賴3、用戶的實體類,dao層,service層(真正開發(fā)時再寫,這里就直接調(diào)用dao層操作數(shù)據(jù)庫)4、實現(xiàn)UserDetailsService接口5、實現(xiàn)UserDetails接口6、驗證用戶登錄信息的攔截器7、驗證用戶權(quán)限的攔截器8、springSecurity配置9、認(rèn)證的Controller以及測試的controller
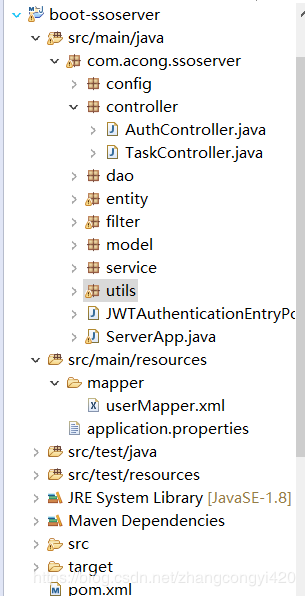
項目結(jié)構(gòu)
pom文件
<dependencies><dependency><groupId>org.springframework.boot</groupId><artifactId>spring-boot-starter-web</artifactId></dependency><dependency><groupId>org.springframework.boot</groupId><artifactId>spring-boot-starter-test</artifactId><scope>test</scope></dependency><dependency><groupId>org.springframework.boot</groupId><artifactId>spring-boot-starter</artifactId></dependency><dependency><groupId>org.springframework.boot</groupId><artifactId>spring-boot-starter-security</artifactId></dependency><!-- https://mvnrepository.com/artifact/org.springframework.security.oauth/spring-security-oauth2 --><dependency><groupId>org.springframework.security.oauth</groupId><artifactId>spring-security-oauth2</artifactId><version>2.3.5.RELEASE</version></dependency><!-- https://mvnrepository.com/artifact/org.springframework.security/spring-security-jwt --><dependency><groupId>org.springframework.security</groupId><artifactId>spring-security-jwt</artifactId><version>1.0.10.RELEASE</version></dependency><!-- https://mvnrepository.com/artifact/org.springframework.security.oauth.boot/spring-security-oauth2-autoconfigure --><dependency><groupId>org.springframework.security.oauth.boot</groupId><artifactId>spring-security-oauth2-autoconfigure</artifactId><version>2.1.4.RELEASE</version></dependency><dependency><groupId>io.jsonwebtoken</groupId><artifactId>jjwt</artifactId><version>0.9.1</version></dependency><dependency><groupId>org.springframework.boot</groupId><artifactId>spring-boot-starter-data-jpa</artifactId></dependency><dependency><groupId>mysql</groupId><artifactId>mysql-connector-java</artifactId></dependency><!-- mybatis依賴 --><dependency><groupId>org.mybatis.spring.boot</groupId><artifactId>mybatis-spring-boot-starter</artifactId><version>1.3.0</version></dependency><dependency><groupId>org.springframework.boot</groupId><artifactId>spring-boot-starter-jdbc</artifactId></dependency><!-- redis依賴 --><dependency><groupId>org.springframework.boot</groupId><artifactId>spring-boot-starter-data-redis</artifactId></dependency></dependencies>
application.properties
server.port=8091#數(shù)據(jù)庫連接spring.datasource.url=jdbc:mysql://localhost:3306/test?useUnicode=truespring.datasource.driver-class-name=com.mysql.jdbc.Driverspring.datasource.username=rootspring.datasource.password=root#mybatis配置mybatis.type-aliases-package=com.congge.entitymybatis.mapper-locations=classpath:mybatis/*.xml#redis配置spring.session.store-type=redisspring.redis.database=0spring,redis.host=127.0.0.1spring.redis.port=6379spring.redis.pool.min-idle=10000spring.redis.timeout=30000
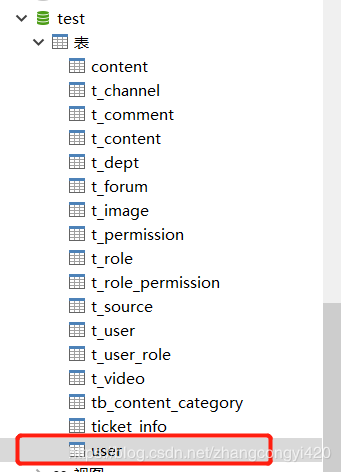
為模擬用戶登錄,這里提前創(chuàng)建了一個測試使用的表,user
實體類User
public class User { private Integer id; private String username; private String password; private String role; public Integer getId() { return id; } public void setId(Integer id) { this.id = id; } public String getUsername() { return username; } public void setUsername(String username) { this.username = username; } public String getPassword() { return password; } public void setPassword(String password) { this.password = password; } public String getRole() { return role; } public void setRole(String role) { this.role = role; } @Override public String toString() { return 'User{' +'id=' + id +', username=’' + username + ’’’ +', password=’' + password + ’’’ +', role=’' + role + ’’’ +’}’; }}
Jwt工具類,用于管理token相關(guān)的操作,可以單測使用
public class TestJwtUtils {public static final String TOKEN_HEADER = 'Authorization'; public static final String TOKEN_PREFIX = 'Bearer ';public static final String SUBJECT = 'congge';public static final long EXPIRITION = 1000 * 24 * 60 * 60 * 7;public static final String APPSECRET_KEY = 'congge_secret'; private static final String ROLE_CLAIMS = 'rol'; public static String generateJsonWebToken(Users user) {if (user.getId() == null || user.getUserName() == null || user.getFaceImage() == null) {return null;}Map<String,Object> map = new HashMap<>();map.put(ROLE_CLAIMS, 'rol');String token = Jwts.builder().setSubject(SUBJECT).setClaims(map).claim('id', user.getId()).claim('name', user.getUserName()).claim('img', user.getFaceImage()).setIssuedAt(new Date()).setExpiration(new Date(System.currentTimeMillis() + EXPIRITION)).signWith(SignatureAlgorithm.HS256, APPSECRET_KEY).compact();return token;}/** * 生成token * @param username * @param role * @return */public static String createToken(String username,String role) {Map<String,Object> map = new HashMap<>();map.put(ROLE_CLAIMS, role);String token = Jwts.builder().setSubject(username).setClaims(map).claim('username',username).setIssuedAt(new Date()).setExpiration(new Date(System.currentTimeMillis() + EXPIRITION)).signWith(SignatureAlgorithm.HS256, APPSECRET_KEY).compact();return token;}public static Claims checkJWT(String token) {try {final Claims claims = Jwts.parser().setSigningKey(APPSECRET_KEY).parseClaimsJws(token).getBody();return claims;} catch (Exception e) {e.printStackTrace();return null;}}/** * 獲取用戶名 * @param token * @return */public static String getUsername(String token){ Claims claims = Jwts.parser().setSigningKey(APPSECRET_KEY).parseClaimsJws(token).getBody(); return claims.get('username').toString(); }/** * 獲取用戶角色 * @param token * @return */ public static String getUserRole(String token){ Claims claims = Jwts.parser().setSigningKey(APPSECRET_KEY).parseClaimsJws(token).getBody(); return claims.get('rol').toString(); } /** * 是否過期 * @param token * @return */ public static boolean isExpiration(String token){ Claims claims = Jwts.parser().setSigningKey(APPSECRET_KEY).parseClaimsJws(token).getBody(); return claims.getExpiration().before(new Date()); }public static void main(String[] args) {String name = 'acong';String role = 'rol';String token = createToken(name,role);System.out.println(token);Claims claims = checkJWT(token);System.out.println(claims.get('username'));System.out.println(getUsername(token));System.out.println(getUserRole(token));System.out.println(isExpiration(token));}/** * eyJhbGciOiJIUzI1NiJ9. * eyJzdWIiOiJjb25nZ2UiLCJpZCI6IjExMDExIiwibmFtZSI6Im51b3dlaXNpa2kiLCJpbWciOiJ3d3cudW9rby5jb20vMS5wbmciLCJpYXQiOjE1NTQ5OTI1NzksImV4cCI6MTU1NTU5NzM3OX0. * 6DJ9En-UBcTiMRldZeevJq3e1NxJgOWryUyim4_-tEE * * @param args *//*public static void main(String[] args) {Users user = new Users();user.setId('11011');user.setUserName('nuoweisiki');user.setFaceImage('www.uoko.com/1.png');String token = generateJsonWebToken(user);System.out.println(token);Claims claims = checkJWT(token);if (claims != null) {String id = claims.get('id').toString();String name = claims.get('name').toString();String img = claims.get('img').toString();String rol = claims.get('rol').toString();System.out.println('id:' + id);System.out.println('name:' + name);System.out.println('img:' + img);System.out.println('rol:' + rol);}}*/}
操作數(shù)據(jù)庫的類
,這里主要是提供用戶注冊的一個save用戶的方法,
@Servicepublic class UserService {@Autowiredprivate UserDao userDao;public void save(User user) {user.setId(1);userDao.save(user);}}
JwtUser
該類封裝登錄用戶相關(guān)信息,例如用戶名,密碼,權(quán)限集合等,需要實現(xiàn)UserDetails 接口,
public class JwtUser implements UserDetails { private Integer id; private String username; private String password; private Collection<? extends GrantedAuthority> authorities; public JwtUser() { } // 寫一個能直接使用user創(chuàng)建jwtUser的構(gòu)造器 public JwtUser(User user) { id = user.getId(); username = user.getUsername(); password = user.getPassword(); authorities = Collections.singleton(new SimpleGrantedAuthority(user.getRole())); } public Collection<? extends GrantedAuthority> getAuthorities() { return authorities; } public String getPassword() { return password; } public String getUsername() { return username; } public boolean isAccountNonExpired() { return true; } public boolean isAccountNonLocked() { return true; } public boolean isCredentialsNonExpired() { return true; } public boolean isEnabled() { return true; } @Override public String toString() { return 'JwtUser{' +'id=' + id +', username=’' + username + ’’’ +', password=’' + password + ’’’ +', authorities=' + authorities +’}’; }}
配置攔截器
JWTAuthenticationFilter
JWTAuthenticationFilter繼承于UsernamePasswordAuthenticationFilter該攔截器用于獲取用戶登錄的信息,只需創(chuàng)建一個token并調(diào)用authenticationManager.authenticate()讓spring-security去進(jìn)行驗證就可以了,不用自己查數(shù)據(jù)庫再對比密碼了,這一步交給spring去操作。 這個操作有點像是shiro的subject.login(new UsernamePasswordToken()),驗證的事情交給框架。
/** * 驗證用戶名密碼正確后,生成一個token,并將token返回給客戶端 * 該類繼承自UsernamePasswordAuthenticationFilter,重寫了其中的2個方法 , * attemptAuthentication:接收并解析用戶憑證。 * successfulAuthentication:用戶成功登錄后,這個方法會被調(diào)用,我們在這個方法里生成token并返回。 */public class JWTAuthenticationFilter extends UsernamePasswordAuthenticationFilter { private AuthenticationManager authenticationManager; public JWTAuthenticationFilter(AuthenticationManager authenticationManager) { this.authenticationManager = authenticationManager; super.setFilterProcessesUrl('/auth/login'); } @Override public Authentication attemptAuthentication(HttpServletRequest request,HttpServletResponse response) throws AuthenticationException { // 從輸入流中獲取到登錄的信息 try { LoginUser loginUser = new ObjectMapper().readValue(request.getInputStream(), LoginUser.class); return authenticationManager.authenticate( new UsernamePasswordAuthenticationToken(loginUser.getUsername(), loginUser.getPassword()) ); } catch (IOException e) { e.printStackTrace(); return null; } } // 成功驗證后調(diào)用的方法 // 如果驗證成功,就生成token并返回 @Override protected void successfulAuthentication(HttpServletRequest request, HttpServletResponse response, FilterChain chain, Authentication authResult) throws IOException, ServletException { JwtUser jwtUser = (JwtUser) authResult.getPrincipal(); System.out.println('jwtUser:' + jwtUser.toString()); String role = ''; Collection<? extends GrantedAuthority> authorities = jwtUser.getAuthorities(); for (GrantedAuthority authority : authorities){ role = authority.getAuthority(); } String token = TestJwtUtils.createToken(jwtUser.getUsername(), role); //String token = JwtTokenUtils.createToken(jwtUser.getUsername(), false); // 返回創(chuàng)建成功的token // 但是這里創(chuàng)建的token只是單純的token // 按照jwt的規(guī)定,最后請求的時候應(yīng)該是 `Bearer token` response.setCharacterEncoding('UTF-8'); response.setContentType('application/json; charset=utf-8'); String tokenStr = JwtTokenUtils.TOKEN_PREFIX + token; response.setHeader('token',tokenStr); } @Override protected void unsuccessfulAuthentication(HttpServletRequest request, HttpServletResponse response, AuthenticationException failed) throws IOException, ServletException { response.getWriter().write('authentication failed, reason: ' + failed.getMessage()); }}
JWTAuthorizationFilter
驗證成功當(dāng)然就是進(jìn)行鑒權(quán)了,每一次需要權(quán)限的請求都需要檢查該用戶是否有該權(quán)限去操作該資源,當(dāng)然這也是框架幫我們做的,那么我們需要做什么呢?很簡單,只要告訴spring-security該用戶是否已登錄,是什么角色,擁有什么權(quán)限就可以了。JWTAuthenticationFilter繼承于BasicAuthenticationFilter,至于為什么要繼承這個我也不太清楚了,這個我也是網(wǎng)上看到的其中一種實現(xiàn),實在springSecurity苦手,不過我覺得不繼承這個也沒事呢(實現(xiàn)以下filter接口或者繼承其他filter實現(xiàn)子類也可以吧)只要確保過濾器的順序,JWTAuthorizationFilter在JWTAuthenticationFilter后面就沒問題了。
/** * 驗證成功當(dāng)然就是進(jìn)行鑒權(quán)了 * 登錄成功之后走此類進(jìn)行鑒權(quán)操作 */public class JWTAuthorizationFilter extends BasicAuthenticationFilter { public JWTAuthorizationFilter(AuthenticationManager authenticationManager) { super(authenticationManager); } @Override protected void doFilterInternal(HttpServletRequest request, HttpServletResponse response, FilterChain chain) throws IOException, ServletException { String tokenHeader = request.getHeader(TestJwtUtils.TOKEN_HEADER); // 如果請求頭中沒有Authorization信息則直接放行了 if (tokenHeader == null || !tokenHeader.startsWith(TestJwtUtils.TOKEN_PREFIX)) { chain.doFilter(request, response); return; } // 如果請求頭中有token,則進(jìn)行解析,并且設(shè)置認(rèn)證信息 SecurityContextHolder.getContext().setAuthentication(getAuthentication(tokenHeader)); super.doFilterInternal(request, response, chain); } // 這里從token中獲取用戶信息并新建一個token private UsernamePasswordAuthenticationToken getAuthentication(String tokenHeader) { String token = tokenHeader.replace(TestJwtUtils.TOKEN_PREFIX, ''); String username = TestJwtUtils.getUsername(token); String role = TestJwtUtils.getUserRole(token); if (username != null){ return new UsernamePasswordAuthenticationToken(username, null, Collections.singleton(new SimpleGrantedAuthority(role)) ); } return null; }}
配置SpringSecurity
到這里基本操作都寫好啦,現(xiàn)在就需要我們將這些辛苦寫好的“組件”組合到一起發(fā)揮作用了,那就需要配置了。需要開啟一下注解@EnableWebSecurity然后再繼承一下WebSecurityConfigurerAdapter就可以啦,
@EnableWebSecurity@EnableGlobalMethodSecurity(prePostEnabled = true)public class SecurityConfig extends WebSecurityConfigurerAdapter { @Autowired @Qualifier('userDetailsServiceImpl') private UserDetailsService userDetailsService; @Bean public BCryptPasswordEncoder bCryptPasswordEncoder(){ return new BCryptPasswordEncoder(); } @Override protected void configure(AuthenticationManagerBuilder auth) throws Exception { auth.userDetailsService(userDetailsService).passwordEncoder(bCryptPasswordEncoder()); } @Override protected void configure(HttpSecurity http) throws Exception { http.cors().and().csrf().disable().authorizeRequests()// 測試用資源,需要驗證了的用戶才能訪問.antMatchers('/tasks/**').authenticated().antMatchers(HttpMethod.DELETE, '/tasks/**').hasRole('ADMIN')// 其他都放行了.anyRequest().permitAll().and().addFilter(new JWTAuthenticationFilter(authenticationManager())).addFilter(new JWTAuthorizationFilter(authenticationManager()))// 不需要session.sessionManagement().sessionCreationPolicy(SessionCreationPolicy.STATELESS).and().exceptionHandling().authenticationEntryPoint(new JWTAuthenticationEntryPoint()); } @Bean CorsConfigurationSource corsConfigurationSource() { final UrlBasedCorsConfigurationSource source = new UrlBasedCorsConfigurationSource(); source.registerCorsConfiguration('/**', new CorsConfiguration().applyPermitDefaultValues()); return source; }}
AuthController
測試類,模擬用戶注冊,
@RestController@RequestMapping('/auth')public class AuthController { @Autowired private UserService userService; @Autowired private BCryptPasswordEncoder bCryptPasswordEncoder; @PostMapping('/register') public String registerUser(@RequestBody Map<String,String> registerUser){ User user = new User(); user.setUsername(registerUser.get('username')); user.setPassword(bCryptPasswordEncoder.encode(registerUser.get('password'))); user.setRole('ROLE_USER'); userService.save(user); return 'success'; }}
注冊是有了,那登錄在哪呢?我們看一下UsernamePasswordAuthenticationFilter的源代碼
public UsernamePasswordAuthenticationFilter() { super(new AntPathRequestMatcher('/login', 'POST')); }
可以看出來默認(rèn)是/login,所以登錄直接使用這個路徑就可以啦~當(dāng)然也可以自定義只需要在JWTAuthenticationFilter的構(gòu)造方法中加入下面那一句話就可以啦
public JWTAuthenticationFilter(AuthenticationManager authenticationManager) { this.authenticationManager = authenticationManager; super.setFilterProcessesUrl('/auth/login'); }
所以現(xiàn)在認(rèn)證的路徑統(tǒng)一了一下也是挺好的~看起來相當(dāng)舒服了注冊:/auth/register登錄:/auth/login
TaskController
提供一個外部訪問的API資源接口,即用戶要訪問該類下面的接口必須要先通過認(rèn)證,后面的測試中也可以看出來,直接貼代碼,
@RequestMapping('/tasks')public class TaskController { @GetMapping('/getTasks') @ResponseBody public String listTasks(){ return '任務(wù)列表'; } @PostMapping @PreAuthorize('hasRole(’ADMIN’)') public String newTasks(){ return '創(chuàng)建了一個新的任務(wù)'; } }
下面我們來測試一下,為了模擬效果比較直觀點,我們使用postMan進(jìn)行測試,
1、首先,我們調(diào)用注冊的方法注冊一個用戶,

注冊成功之后,我們看到數(shù)據(jù)庫已經(jīng)有了一個用戶,

2、使用該用戶進(jìn)行登錄,我們希望的是登錄成功之后,后臺生成一個token并返回給前端,這樣后面的接口調(diào)用中直接帶上這個token即可,
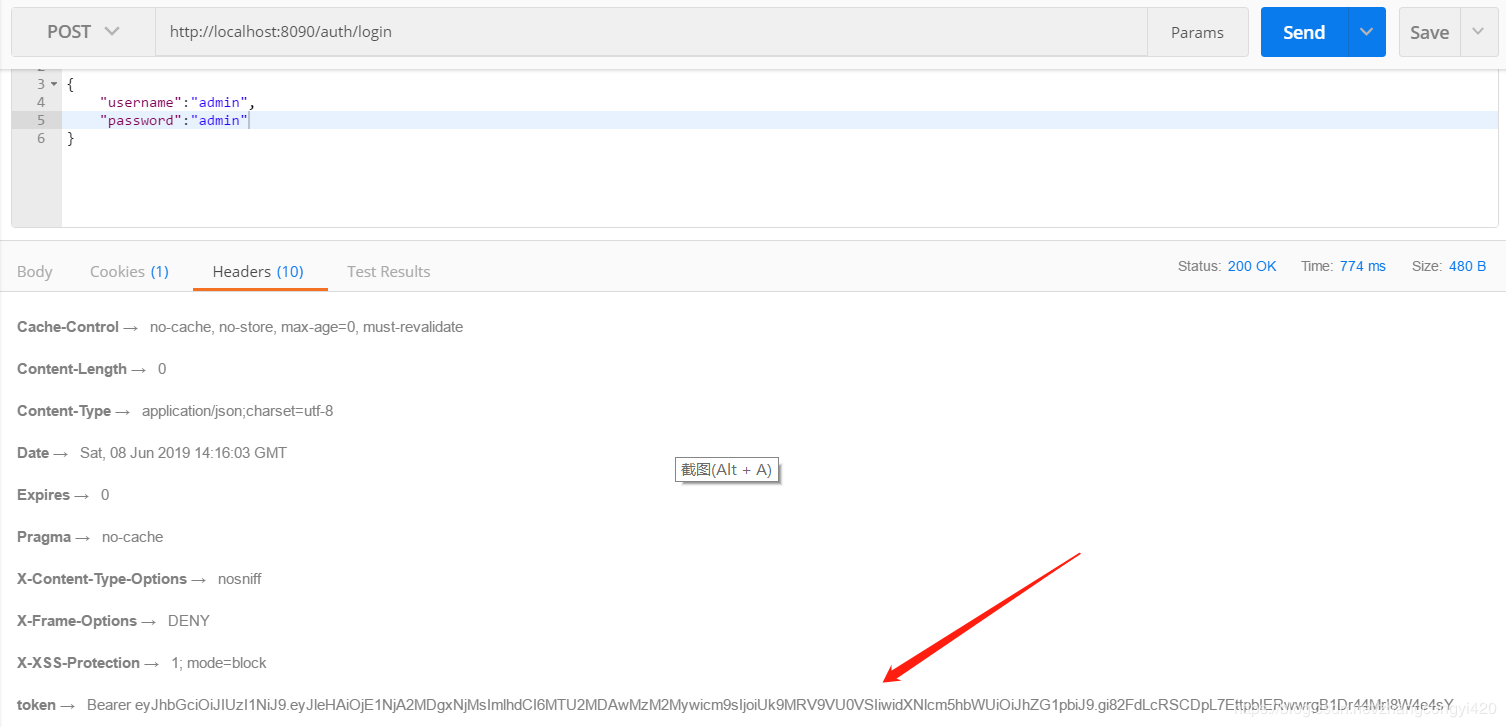
可以看到登錄成功,后臺反返回了token,下面我們使用這個token請求其他的接口,測試一下getTasks這個接口,注意需要在postMan的請求header里面帶上token信息,這里是全部的token,即包含Bearer 的整個字符串,
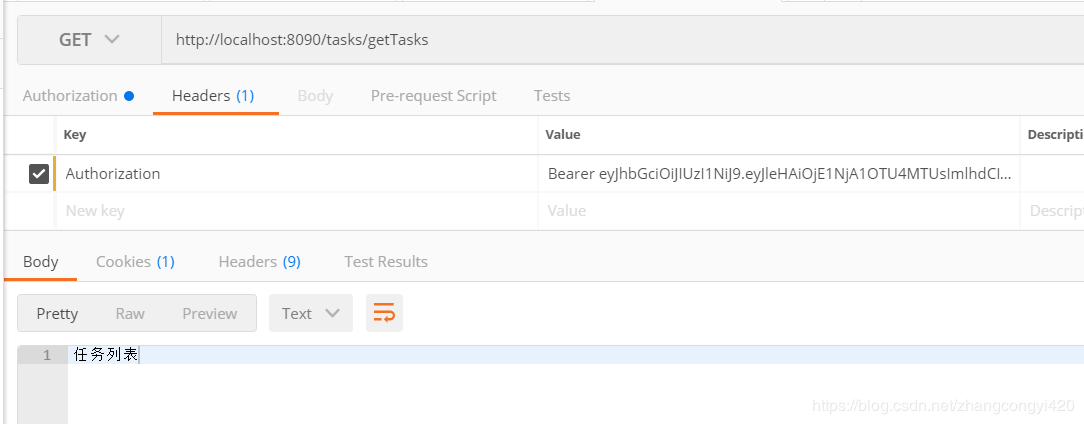
這時候,成功請求到了接口的數(shù)據(jù),大家可以測試一下將過期時間調(diào)整的短一點,然后再去請求看看會有什么樣的效果,這里就不做演示了。
本篇到這里基本就結(jié)束了,關(guān)于springsecurity其實內(nèi)容還是很多的,里面的用法也比較復(fù)雜,大家抽空可以做深入的研究,篇幅原因不做過多介紹了。最后感謝觀看。
附上源碼地址:boot-ssoserver_jb51.rar
到此這篇關(guān)于Springboot+SpringSecurity+JWT實現(xiàn)用戶登錄和權(quán)限認(rèn)證示例的文章就介紹到這了,更多相關(guān)Springboot SpringSecurity JWT內(nèi)容請搜索好吧啦網(wǎng)以前的文章或繼續(xù)瀏覽下面的相關(guān)文章希望大家以后多多支持好吧啦網(wǎng)!
相關(guān)文章:
1. 在vue中封裝方法以及多處引用該方法詳解2. IntelliJ IDEA2020.2.2創(chuàng)建Servlet方法及404問題3. Android 基于Bitmap的四種圖片壓縮方式4. Python的Tqdm模塊實現(xiàn)進(jìn)度條配置5. 淺談python多線程和多線程變量共享問題介紹6. Python如何批量獲取文件夾的大小并保存7. CSS3中Transition屬性詳解以及示例分享8. CSS代碼檢查工具stylelint的使用方法詳解9. Python 多線程之threading 模塊的使用10. Java WindowBuilder 安裝及基本使用的教程

 網(wǎng)公網(wǎng)安備