Springboot實現自定義錯誤頁面的方法(錯誤處理機制)
一般我們在做項目的時候,錯誤機制是必備的常識,基本每個項目都會做錯誤處理,不可能項目一報錯直接跳到原始報錯頁面,本篇博客主要針對springboot默認的處理機制,以及自定義錯誤頁面處理進行講解,需要的朋友們下面隨著小編來一起學習學習吧!
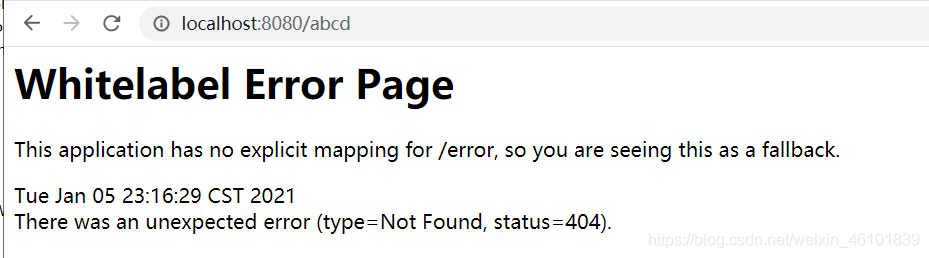
默認效果示例springboot他是有自己默認的處理機制的。在你剛創建一個springboot項目去訪問一個沒有的路徑會發現他是會彈出來這樣的信息。
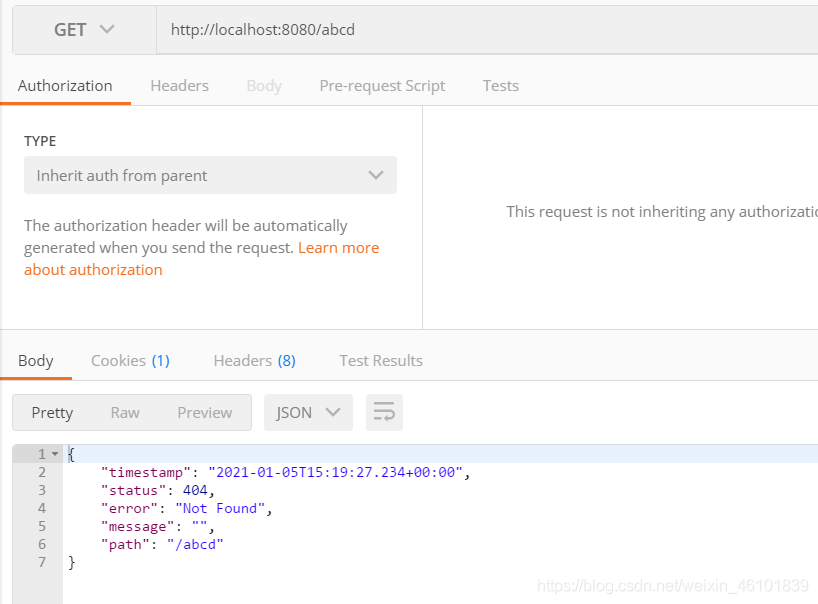
而我們用postman直接接口訪問,會發現他返回的不再是頁面。默認響應一個json數據
這時候該有人在想,springboot他是如何識別我們是否是頁面訪問的呢?
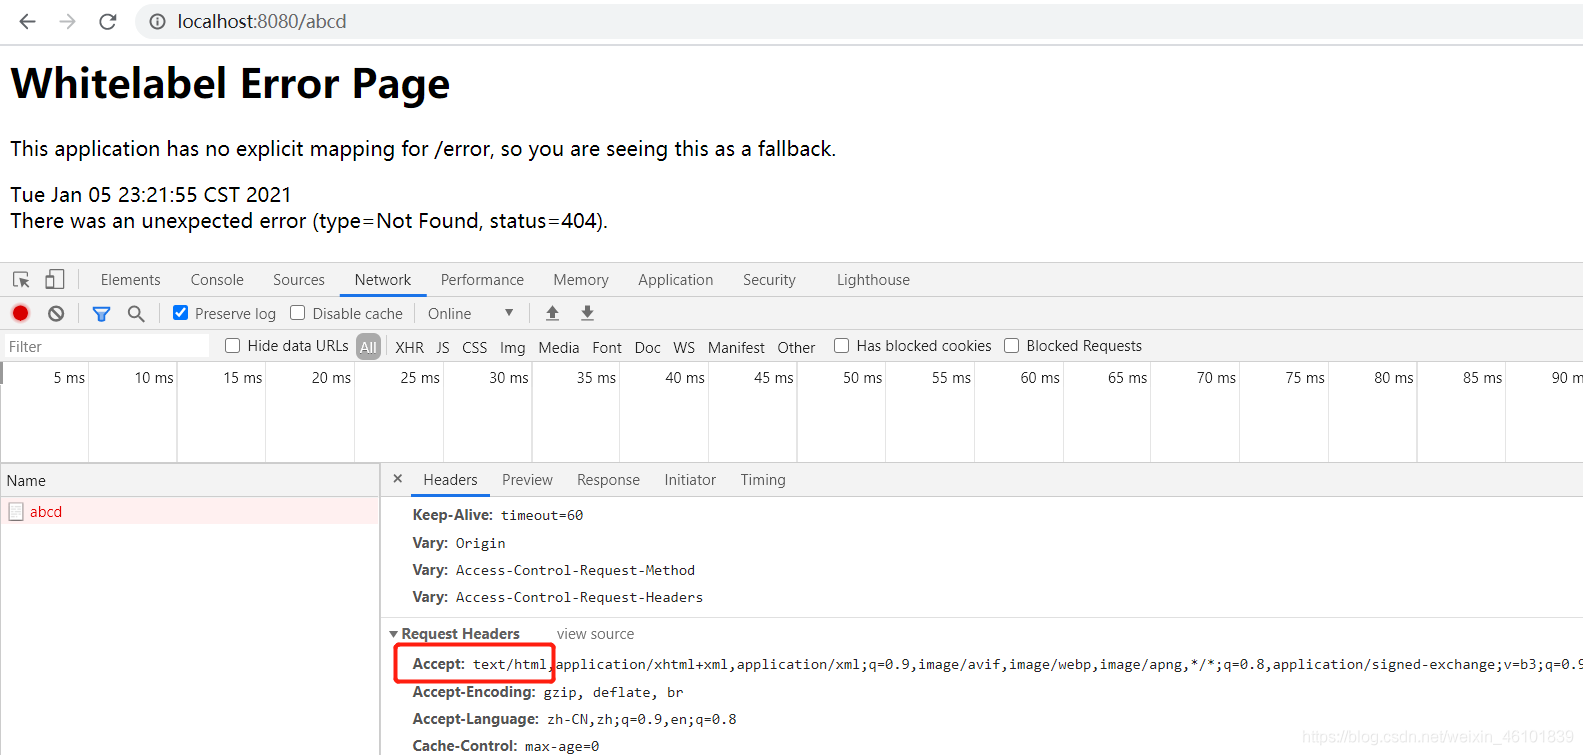
效果示例原因springboot默認錯誤處理機制他是根據Headers當中的Accept來判斷的,這個參數無論是postman訪問還是頁面訪問都會傳入。
頁面訪問的時候他傳入的是test/html
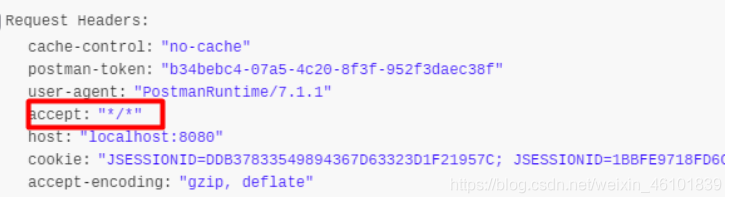
而postman是這個
原因我們大概了解了,接下來通過翻看源碼我們簡單的來理解一下他的原理。
簡單回顧springboot原理springboot之所以開箱即用,是因為很多框架他已經幫我們配置好了,他內部有很多AutoConfiguration,其中ErrorMvcAutoConfiguration類就是錯誤機制配置。
存放于這個jar包下

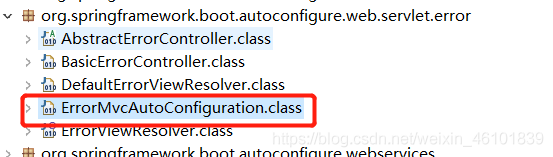
springboo 2.4版本當中ErrorMvcAutoConfiguration存放于這個路徑
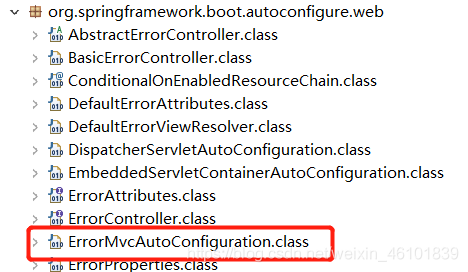
springboot 1.5版本ErrorMvcAutoConfiguration存放于這個路徑
當然他只是版本之間類存放位置發生一些改動,但是源碼區別不是很大。
springboot內部使用到配置的地方,都是去容器當中取的,容器的作用就是將這些配置實例化過程放到了啟動,我們在用的時候直接從容器當中取而無需創建,這也就是圍繞容器開發的原因,在使用springboot的時候應該也都會發現,我們想要修改springboot的一些默認配置都會想方設法把他放到容器當中,他才會生效。
在源碼當中會發現存在大量@ConditionalOnMissingBean,這個就是假如我們項目當中配置了該項配置,springboot就不會使用他的默認配置了,就直接用我們配置好的。
ErrorMvcAutoConfiguration配置ErrorMvcAutoConfiguration給容器中添加了以下組件:
1、DefaultErrorAttributes
頁面當中錯誤信息,以及訪問時間等等,都是在DefaultErrorAttributes當中的這兩個方法當中獲取的。
@Overridepublic Map<String, Object> getErrorAttributes(WebRequest webRequest, ErrorAttributeOptions options) {Map<String, Object> errorAttributes = getErrorAttributes(webRequest, options.isIncluded(Include.STACK_TRACE));if (Boolean.TRUE.equals(this.includeException)) {options = options.including(Include.EXCEPTION);}if (!options.isIncluded(Include.EXCEPTION)) {errorAttributes.remove('exception');}if (!options.isIncluded(Include.STACK_TRACE)) {errorAttributes.remove('trace');}if (!options.isIncluded(Include.MESSAGE) && errorAttributes.get('message') != null) {errorAttributes.put('message', '');}if (!options.isIncluded(Include.BINDING_ERRORS)) {errorAttributes.remove('errors');}return errorAttributes;}@Override@Deprecatedpublic Map<String, Object> getErrorAttributes(WebRequest webRequest, boolean includeStackTrace) {Map<String, Object> errorAttributes = new LinkedHashMap<>();errorAttributes.put('timestamp', new Date());addStatus(errorAttributes, webRequest);addErrorDetails(errorAttributes, webRequest, includeStackTrace);addPath(errorAttributes, webRequest);return errorAttributes;}2、BasicErrorController
處理默認/error請求

也正是BasicErrorController這兩個方法,來判斷是返回錯誤頁面還是返回json數據
@RequestMapping(produces = MediaType.TEXT_HTML_VALUE)public ModelAndView errorHtml(HttpServletRequest request, HttpServletResponse response) {HttpStatus status = getStatus(request);Map<String, Object> model = Collections.unmodifiableMap(getErrorAttributes(request, getErrorAttributeOptions(request, MediaType.TEXT_HTML)));response.setStatus(status.value());ModelAndView modelAndView = resolveErrorView(request, response, status, model);return (modelAndView != null) ? modelAndView : new ModelAndView('error', model);}@RequestMappingpublic ResponseEntity<Map<String, Object>> error(HttpServletRequest request) {HttpStatus status = getStatus(request);if (status == HttpStatus.NO_CONTENT) {return new ResponseEntity<>(status);}Map<String, Object> body = getErrorAttributes(request, getErrorAttributeOptions(request, MediaType.ALL));return new ResponseEntity<>(body, status);}3、ErrorPageCustomizer
系統出現錯誤以后來到error請求進行處理;(就相當于是web.xml注冊的錯誤頁 面規則)
加粗樣式
4、DefaultErrorViewResolverDefaultErrorViewResolverConfiguration內部類
在這里我們可以看出他將DefaultErrorViewResolver注入到了容器當中
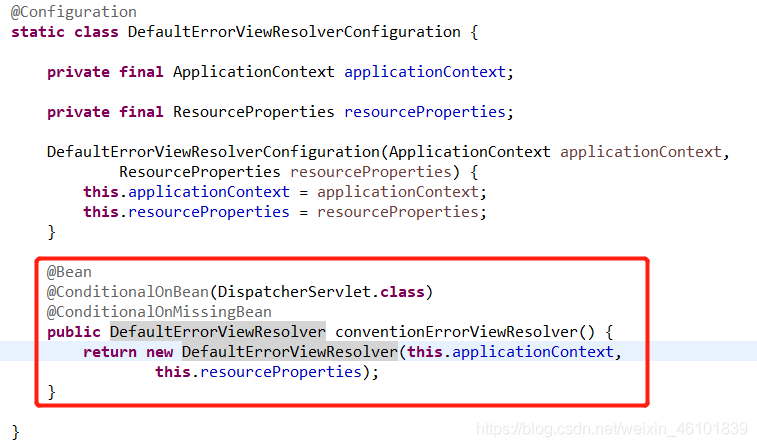
DefaultErrorViewResolver這個對象當中有兩個方法,來完成了根據狀態跳轉頁面。
@Overridepublic ModelAndView resolveErrorView(HttpServletRequest request, HttpStatus status,Map<String, Object> model) {//獲取錯誤狀態碼,這里可以看出他將狀態碼傳入了resolve方法ModelAndView modelAndView = resolve(String.valueOf(status), model);if (modelAndView == null && SERIES_VIEWS.containsKey(status.series())) {modelAndView = resolve(SERIES_VIEWS.get(status.series()), model);}return modelAndView;}private ModelAndView resolve(String viewName, Map<String, Object> model) {//從這里可以得知,當我們報404錯誤的時候,他會去error文件夾找404的頁面,如果500就找500的頁面。String errorViewName = 'error/' + viewName;//模板引擎可以解析這個頁面地址就用模板引擎解析TemplateAvailabilityProvider provider = this.templateAvailabilityProviders.getProvider(errorViewName, this.applicationContext);//模板引擎可用的情況下返回到errorViewName指定的視圖地址if (provider != null) {return new ModelAndView(errorViewName, model);}//模板引擎不可用,就在靜態資源文件夾下找errorViewName對應的頁面 error/404.htmlreturn resolveResource(errorViewName, model);}組件執行步驟
一但系統出現4xx或者5xx之類的錯誤;ErrorPageCustomizer就會生效(定制錯誤的響應規則);就會來到/error 請求;就會被BasicErrorController處理;去哪個頁面是由DefaultErrorViewResolver解析得到的;
代碼示例這里我選擇直接上代碼,方便大家更快的上手。
1、導入依賴這里我引用了thymeleaf模板,springboot內部為我們配置好了頁面跳轉功能。
這是本人寫的一篇關于thymeleaf的博客,沒用過的或者不是很了解的可以學習一下!
thymeleaf學習: https://blog.csdn.net/weixin_43888891/article/details/111350061.
<dependencies><dependency><groupId>org.springframework.boot</groupId><artifactId>spring-boot-starter-thymeleaf</artifactId></dependency><dependency><groupId>org.springframework.boot</groupId><artifactId>spring-boot-starter-web</artifactId></dependency><dependency><groupId>org.springframework.boot</groupId><artifactId>spring-boot-starter-tomcat</artifactId><scope>provided</scope></dependency></dependencies>2、自定義異常
作用:面對一些因為沒找到數據而報空指針的錯誤,我們可以采取手動拋異常。
package com.gzl.cn;import org.springframework.http.HttpStatus;import org.springframework.web.bind.annotation.ResponseStatus;@ResponseStatus(HttpStatus.NOT_FOUND)public class NotFoundException extends RuntimeException { public NotFoundException() { } public NotFoundException(String message) { super(message); } public NotFoundException(String message, Throwable cause) { super(message, cause); }}3、定義異常攔截
package com.gzl.cn.handler;import org.slf4j.Logger;import org.slf4j.LoggerFactory;import org.springframework.core.annotation.AnnotationUtils;import org.springframework.web.bind.annotation.ControllerAdvice;import org.springframework.web.bind.annotation.ExceptionHandler;import org.springframework.web.bind.annotation.ResponseStatus;import org.springframework.web.servlet.ModelAndView;import javax.servlet.http.HttpServletRequest;@ControllerAdvicepublic class ControllerExceptionHandler { private final Logger logger = LoggerFactory.getLogger(this.getClass()); @ExceptionHandler(Exception.class) public ModelAndView exceptionHander(HttpServletRequest request, Exception e) throws Exception { logger.error('Requst URL : {},Exception : {}', request.getRequestURL(),e);//假如是自定義的異常,就讓他進入404,其他的一概都進入error頁面 if (AnnotationUtils.findAnnotation(e.getClass(), ResponseStatus.class) != null) { throw e; } ModelAndView mv = new ModelAndView(); mv.addObject('url',request.getRequestURL()); mv.addObject('exception', e); mv.setViewName('error/error'); return mv; }}4、創建測試接口
package com.gzl.cn.controller;import org.springframework.stereotype.Controller;import org.springframework.ui.Model;import org.springframework.web.bind.annotation.GetMapping;import com.gzl.cn.NotFoundException;@Controllerpublic class HelloController { //這個請求我們拋出我們定義的錯誤,然后被攔截到直接跳到404,這個一般當有一些數據查不到的時候手動拋出 @GetMapping('/test') public String test(Model model){ String a = null; if(a == null) { throw new NotFoundException(); } System.out.println(a.toString()); return 'success'; } //這個請求由于a為null直接進500頁面 @GetMapping('/test2') public String test2(Model model){ String a = null; System.out.println(a.toString()); return 'success'; }}5、創建404頁面
<!DOCTYPE html><html><head><meta charset='UTF-8'><title>Insert title here</title></head><body><h2>404</h2> <p>對不起,你訪問的資源不存在</p></body></html>6、創建error頁面
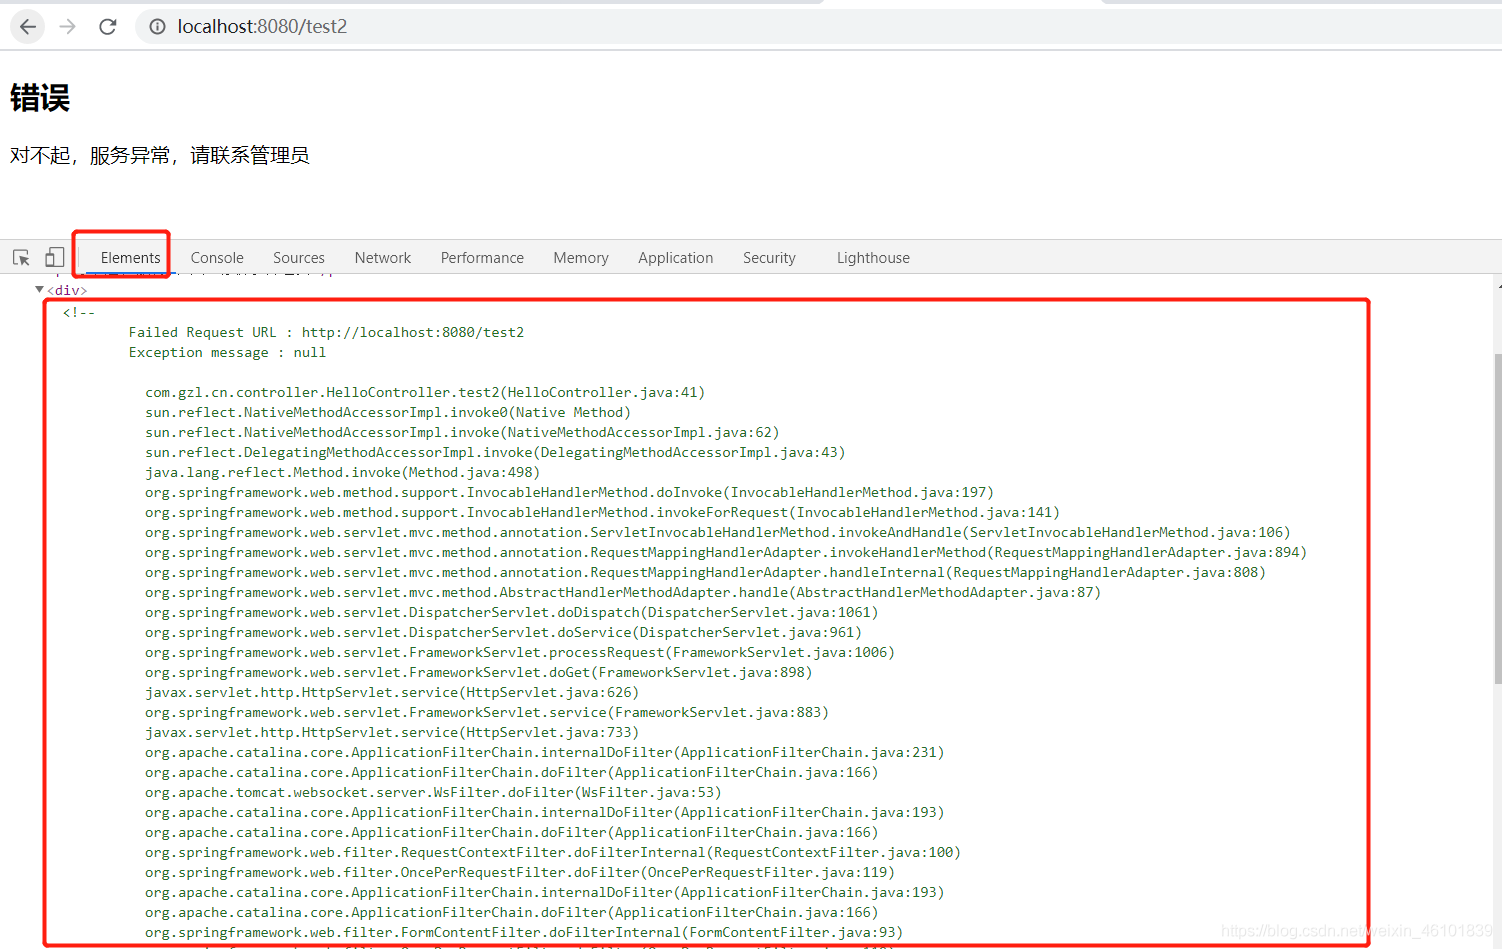
<!DOCTYPE html><html><head><meta charset='UTF-8'><title>Insert title here</title></head><body><h2>錯誤</h2> <p>對不起,服務異常,請聯系管理員</p> <!--這段代碼在頁面不會展現,只會出現在控制臺,假如線上報錯可以看控制臺快速鎖定錯誤原因--> <div> <div th:utext='’<!--’' th:remove='tag'></div> <div th:utext='’Failed Request URL : ’ + ${url}' th:remove='tag'></div> <div th:utext='’Exception message : ’ + ${exception.message}' th:remove='tag'></div> <ul th:remove='tag'> <li th:each='st : ${exception.stackTrace}' th:remove='tag'><span th:utext='${st}' th:remove='tag'></span></li> </ul> <div th:utext='’-->’' th:remove='tag'></div></div></body></html>7、項目結構

http://localhost:8080/test2
這時候可以觀察到,那段代碼在此處生效了,這樣做的好處就是客戶看不到,看到了反而也不美觀,所以采取這種方式。
訪問一個不存在的頁面
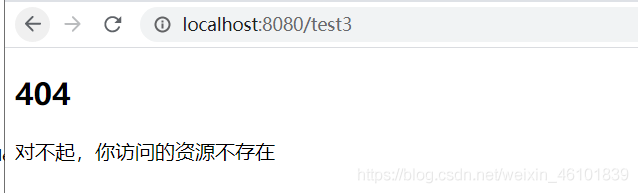
訪問http://localhost:8080/test這個時候會發現他跳到了404頁面

到此這篇關于Springboot實現自定義錯誤頁面的方法(錯誤處理機制)的文章就介紹到這了,更多相關Springboot自定義錯誤頁面內容請搜索好吧啦網以前的文章或繼續瀏覽下面的相關文章希望大家以后多多支持好吧啦網!
相關文章:
 網公網安備
網公網安備