淺析Android加載字體包及封裝的方法
TextView加載字體包
在 Android 中,若需要使得某個TextView加載字體包,使用以下方式即可:
Typeface typeFace =Typeface.createFromAsset(getAssets(),'fonts/Bold.otf'); textView.setTypeface(typeFace);
至于字體包的位置:
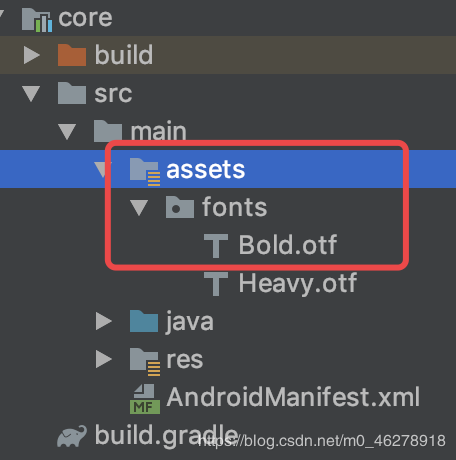
通過以上方法,可以使得一個TextView加載某種字體包,但是,還有這種需求:
部分TextView加載字體包 每個TextView加載的字體包不一定一樣這時,我們就需要稍微封裝下,將其封裝成一個自定義TextView類,若需要使用字體包,則加載該類,同時,可以根據xml里面的值,從而加載不同的字體包。
封裝
定義屬性值
首先,我們需要從xml里面獲取值,因此,需要在attr中進行屬性值的定義:
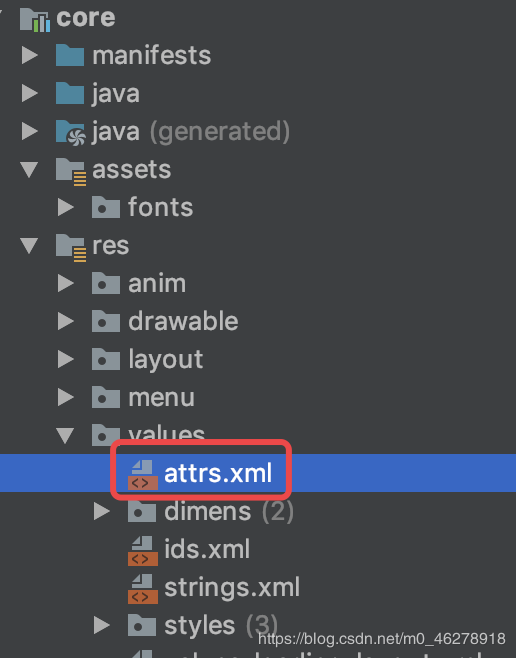
<declare-styleable name='FontTextView'> <attr name='fontType' format='enum'> <enum name='bold' value='1' /> <enum name='heavy' value='2' /> </attr> </declare-styleable>
這里我只定義了兩種屬性,大家可以根據需求進行增減。
創建自定義TextView
public class FontTextView extends AppCompatTextView { public FontTextView(Context context) { super(context); } public FontTextView(Context context, @Nullable AttributeSet attrs) { this(context, attrs, 0); } public FontTextView(Context context, @Nullable AttributeSet attrs, int defStyleAttr) { super(context, attrs, defStyleAttr); }}
獲取屬性值
//獲取參數 TypedArray a = context.obtainStyledAttributes(attrs, R.styleable.FontTextView, defStyleAttr, 0); int fontType = a.getInt(R.styleable.FontTextView_fontType, 1);
進行值判斷并加載不同的字體包
private final int BOLD = 1; private final int HEAVY = 2; String fontPath = null; switch (fontType) { case BOLD: fontPath = 'fonts/Bold.otf'; break; case HEAVY: fontPath = 'fonts/Heavy.otf'; break; default: } //設置字體 if (!TextUtils.isEmpty(fontPath)) { Typeface typeFace = Typeface.createFromAsset(getContext().getAssets(), fontPath); setTypeface(typeFace); }
全部源碼
public class FontTextView extends AppCompatTextView { private final int BOLD = 1; private final int HEAVY = 2; public FontTextView(Context context) { super(context); } public FontTextView(Context context, @Nullable AttributeSet attrs) { this(context, attrs, 0); } public FontTextView(Context context, @Nullable AttributeSet attrs, int defStyleAttr) { super(context, attrs, defStyleAttr); //獲取參數 TypedArray a = context.obtainStyledAttributes(attrs, R.styleable.FontTextView, defStyleAttr, 0); int fontType = a.getInt(R.styleable.FontTextView_fontType, 1); String fontPath = null; switch (fontType) { case BOLD: fontPath = 'fonts/Bold.otf'; break; case HEAVY: fontPath = 'fonts/Heavy.otf'; break; default: } //設置字體 if (!TextUtils.isEmpty(fontPath)) { Typeface typeFace = Typeface.createFromAsset(getContext().getAssets(), fontPath); setTypeface(typeFace); } }}
若需要使用字體包TextView,使用以下方式即可:
<com.jm.core.common.widget.textview.FontTextView android:layout_width='wrap_content' android:layout_height='wrap_content' app:fontType='bold' android:text='測試' />
效果

到此這篇關于淺析Android加載字體包及封裝的方法的文章就介紹到這了,更多相關android加載字體包封裝內容請搜索好吧啦網以前的文章或繼續瀏覽下面的相關文章希望大家以后多多支持好吧啦網!
相關文章:
 網公網安備
網公網安備