Android的簡(jiǎn)單前后端交互(okHttp+springboot+mysql)
前陣子發(fā)現(xiàn)了個(gè)有意思又好用的框架——okHttp。由于課程設(shè)計(jì)需要,無意間發(fā)現(xiàn)了這個(gè)框架,打算利用此框架與后端交互,可以參考前后端分離的項(xiàng)目,把a(bǔ)ndroid當(dāng)做前端,springboot當(dāng)做后端,以下是二者的簡(jiǎn)單交互。
okHttp說明(1)android網(wǎng)絡(luò)框架之OKhttp
一個(gè)處理網(wǎng)絡(luò)請(qǐng)求的開源項(xiàng)目,是安卓端最火熱的輕量級(jí)框架,由移動(dòng)支付Square公司貢獻(xiàn)(該公司還貢獻(xiàn)了Picasso)
用于替代HttpUrlConnection和Apache HttpClient
(2)okHttp優(yōu)勢(shì)
允許連接到同一個(gè)主機(jī)地址的所有請(qǐng)求,提高請(qǐng)求效率
共享Socket,減少對(duì)服務(wù)器的請(qǐng)求次數(shù)
通過連接池,減少了請(qǐng)求延遲
緩存響應(yīng)數(shù)據(jù)來減少重復(fù)的網(wǎng)絡(luò)請(qǐng)求
減少了對(duì)數(shù)據(jù)流量的消耗
自動(dòng)處理GZip壓縮
(3)OKhttp的功能
get,post請(qǐng)求
文件的上傳下載
加載圖片(內(nèi)部會(huì)圖片大小自動(dòng)壓縮)
支持請(qǐng)求回調(diào),直接返回對(duì)象、對(duì)象集合
支持session的保持
android前端邏輯控制:LoginActivity.java
import androidx.appcompat.app.AppCompatActivity;import android.os.Bundle;import android.util.Log;import android.view.View;import android.widget.Button;import android.widget.EditText;import android.widget.TextView;import com.campus.book.R;import com.campus.book.entity.User;import com.campus.book.util.http.OKHttpUtil;import com.google.gson.Gson;public class LoginActivity extends AppCompatActivity {//這個(gè)url可以通過cmd中輸入 ipconfig IPv4 地址即為本地電腦的地址 8081為后端的端口號(hào) private String baseUrl='http://192.168.xxx.1:8081'; private TextView tv=null; EditText userId = null; EditText pwd = null ; Button login=null; private Button registry=null; @Override protected void onCreate(Bundle savedInstanceState) {super.onCreate(savedInstanceState);setContentView(R.layout.activity_login);setTitle('登錄');tv=findViewById(R.id.tv);login = (Button)findViewById(R.id.login);registry = (Button)findViewById(R.id.registry);userId=(EditText) findViewById(R.id.userId);pwd=findViewById(R.id.pwd);login.setOnClickListener(new View.OnClickListener() { @Override public void onClick(View view) {String id = userId.getText().toString();String password=pwd.getText().toString();User user=new User(id,password);Gson gson=new Gson();String json=gson.toJson(user);String args[]=new String[]{'user','login'};String res= OKHttpUtil.postSyncRequest(baseUrl,json,args);Log.d('同步:',res);res= OKHttpUtil.postAsyncRequest(baseUrl,json,args);Log.d('異步:',res); }});registry.setOnClickListener(new View.OnClickListener() { @Override public void onClick(View view) {String args[]=new String[]{'user','getUser','123'};String res= OKHttpUtil.getSyncRequest(baseUrl,args);System.out.println('同步:'+res);String args1[]=new String[]{'user','getUser','123'}; res= OKHttpUtil.getAsyncRequest(baseUrl,args1);System.out.println('異步:'+res); }}); }}
布局方式:activity_login.xml
<?xml version='1.0' encoding='utf-8'?><LinearLayout xmlns:android='http://schemas.android.com/apk/res/android' xmlns:app='http://schemas.android.com/apk/res-auto' xmlns:tools='http://schemas.android.com/tools' android:orientation='vertical' android:layout_width='match_parent' android:layout_height='match_parent' tools:context='.activity.LoginActivity'><TextView android:layout_width='match_parent' android:layout_height='wrap_content' android: android:text='內(nèi)容:'/> <FrameLayoutandroid:layout_width='wrap_content'android:layout_height='wrap_content'><ImageView android: android:layout_width='wrap_content' android:layout_height='wrap_content' android:background='@drawable/login' /><!--@drawable/login改成相應(yīng)的背景圖--><TableLayout android:layout_width='350dp' android:layout_height='match_parent' android:stretchColumns='*' android:layout_marginBottom='150sp' android:layout_gravity='center' > <TableRow android:layout_height='match_parent'><EditText android: android:layout_column='0' android:layout_span='2' android:hint='請(qǐng)輸入手機(jī)號(hào)' android:textColorHint='#FFFFFF' android:textColor='#FFFFFF' android:textCursorDrawable='@drawable/cursor_color' android:textSize='15sp' /> </TableRow> <TableRow android:layout_height='match_parent' ><EditText android: android:inputType='textPassword' android:layout_column='0' android:layout_span='2' android:hint='請(qǐng)輸入密碼' android:textColorHint='#FFFFFF' android:textColor='#FFFFFF' android:textCursorDrawable='@drawable/cursor_color' android:textSize='15sp' /> </TableRow> <TableRow android:layout_height='match_parent'><Button android: android:layout_height='wrap_content' android:textColor='#FFFFFF' android:background='#000000' android:layout_margin='8dp' android:textSize='15sp' android:text='登錄' /><Button android: android:layout_width='wrap_content' android:layout_height='wrap_content' android:textColor='#FFFFFF' android:background='#000000' android:layout_margin='8dp' android:textSize='15sp' android:text='注冊(cè)' /> </TableRow></TableLayout> </FrameLayout></LinearLayout>
其中,cursor_color.xml在drawable中。
<?xml version='1.0' encoding='utf-8'?><shape xmlns:android='http://schemas.android.com/apk/res/android' android:shape='rectangle' > <size android: /> <solid android:color='@android:color/black' /></shape>springboot+mysql后端
(1)數(shù)據(jù)庫
表user

(2)springboot中的controller層
如何搭建springboot工程就不再贅述了(如有需要,可留言,后續(xù)可發(fā)搭建教程),可自行參考其他文章。
@RestController@RequestMapping('//user')public class UserController {@Autowiredprivate UserService userService;//Gson gson= JsonBean.getGson(); static Gson gson=new GsonBuilder().serializeNulls().create();@GetMapping('/list')public List<User> list() {return this.userService.list();}@PostMapping('/login')public User login(String json){User result=null;User user=null;User user1=null;try{user=gson.fromJson(json,User.class);}catch (Exception e){e.printStackTrace();}user1=userService.getById(user.getUserId());if(user1!=null){//存在該賬戶if(user1.getPassword().equals(user.getPassword())){//密碼正確result=user1;}else{//密碼錯(cuò)誤}}else{//不存在該賬戶}return result;}@GetMapping('/getUser/{id}')public User getUser(@PathVariable('id') Serializable id){User user=userService.getById(id);if(user!=null){//存在}else{//不存在}return user;}}
運(yùn)行(交互)效果

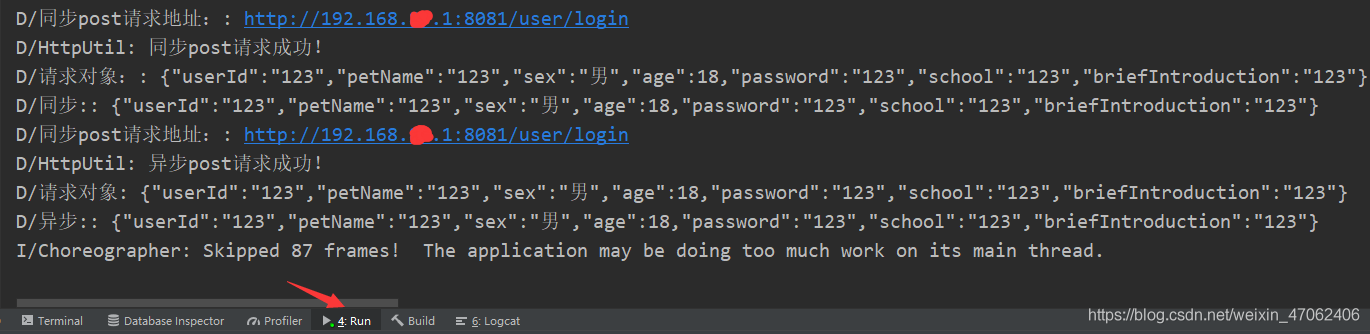
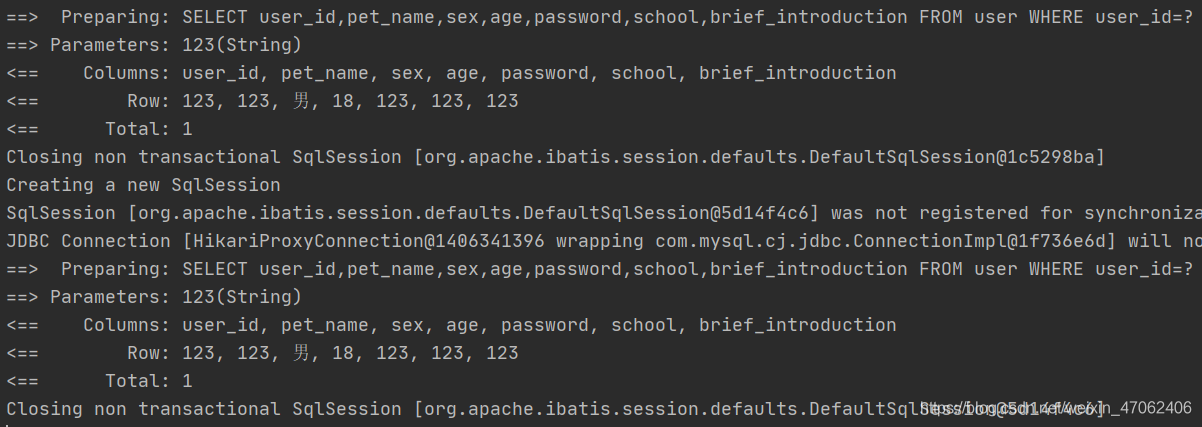
(1)點(diǎn)擊“登錄”按鈕,發(fā)起post請(qǐng)求
android端
后端
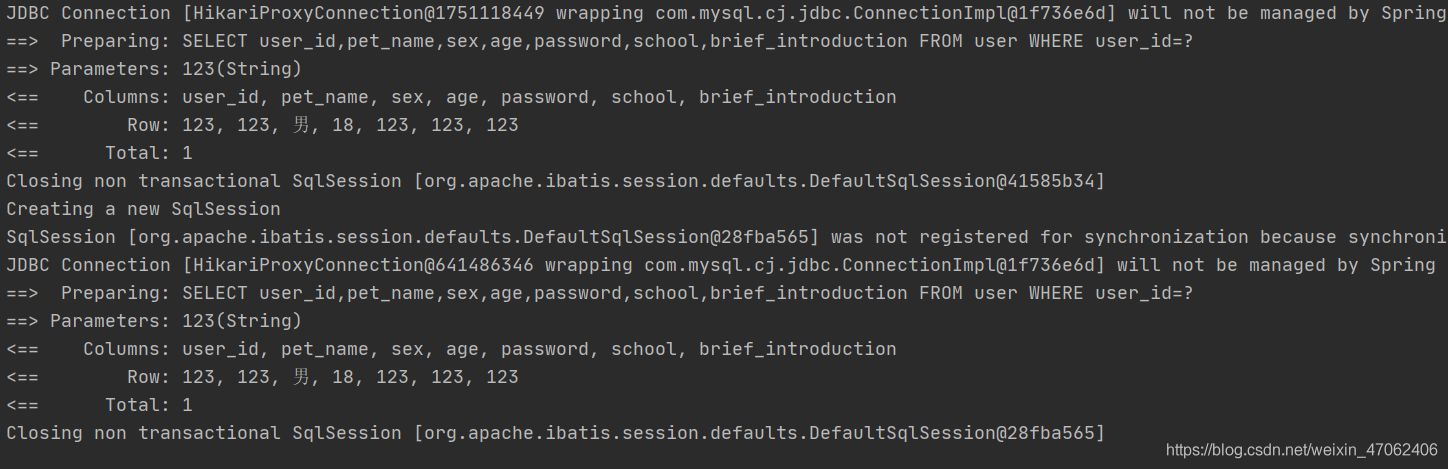
(2)點(diǎn)擊“注冊(cè)”按鈕發(fā)起get請(qǐng)求
android端

后端
這樣就達(dá)到了前后端分離的效果,是不是很神奇!可以愉快的和小組成員分開進(jìn)行開發(fā)啦!
在Android端中用到了個(gè)人結(jié)合需要編寫的okHttp的工具類,可參考上篇文章:okHttp的get和post請(qǐng)求的簡(jiǎn)單封裝與使用
到此這篇關(guān)于Android的簡(jiǎn)單前后端交互(okHttp+springboot+mysql)的文章就介紹到這了,更多相關(guān)Android 前后端交互內(nèi)容請(qǐng)搜索好吧啦網(wǎng)以前的文章或繼續(xù)瀏覽下面的相關(guān)文章希望大家以后多多支持好吧啦網(wǎng)!
相關(guān)文章:
 網(wǎng)公網(wǎng)安備