Java +Tomcat + SpringMVC實現(xiàn)頁面訪問示例解析
window7下Java環(huán)境安裝記錄:
一、安裝Tomcat
1、下載tomcat 7.0,解壓,無需安裝,放置到目錄:D:apache-tomcat-7.0.90。2、配置系統(tǒng)環(huán)境變量,CATALINA_BASE=D:apache-tomcat-7.0.90,CATALINA_HOME=D:apache-tomcat-7.0.90,在Path中新增“%CATALINA_HOME%lib;%CATALINA_HOME%bin”的環(huán)境變量。3、進入D:apache-tomcat-7.0.90bin,執(zhí)行startup啟動tomcat,瀏覽器中輸入“127.0.0.1:8080”即可查看是否成功。
二、使用SpringMVC搭建頁面
1、使用Idea創(chuàng)建SpringMVC工程,webAppTest2

2、修改web/WEB-INF/web.xml的url規(guī)則為接受所有
<?xml version='1.0' encoding='UTF-8'?><web-app xmlns='http://xmlns.jcp.org/xml/ns/javaee' xmlns:xsi='http://www.w3.org/2001/XMLSchema-instance' xsi:schemaLocation='http://xmlns.jcp.org/xml/ns/javaee http://xmlns.jcp.org/xml/ns/javaee/web-app_4_0.xsd' version='4.0'> <context-param> <param-name>contextConfigLocation</param-name> <param-value>/WEB-INF/applicationContext.xml</param-value> </context-param> <listener> <listener-class>org.springframework.web.context.ContextLoaderListener</listener-class> </listener> <servlet> <servlet-name>dispatcher</servlet-name> <servlet-class>org.springframework.web.servlet.DispatcherServlet</servlet-class> <init-param> <param-name>contextConfigLocation</param-name> <param-value>classpath:dispatcher-servlet.xml</param-value> </init-param> </servlet> <servlet-mapping> <servlet-name>dispatcher</servlet-name> <url-pattern>/</url-pattern> </servlet-mapping></web-app>
3、在src下創(chuàng)建dispatcher-servlet.xml文件
<?xml version='1.0' encoding='UTF-8'?><beans xmlns='http://www.springframework.org/schema/beans' xmlns:xsi='http://www.w3.org/2001/XMLSchema-instance' xmlns:context='http://www.springframework.org/schema/context' xmlns:mvc='http://www.springframework.org/schema/mvc' xsi:schemaLocation='http://www.springframework.org/schema/beans http://www.springframework.org/schema/beans/spring-beans.xsd http://www.springframework.org/schema/context http://www.springframework.org/schema/context/spring-context-4.1.xsd http://www.springframework.org/schema/mvc http://www.springframework.org/schema/mvc/spring-mvc-4.1.xsd'> <!-- scan the package and the sub package --> <context:component-scan base-package='test'/> <!-- don’t handle the static resource --> <mvc:default-servlet-handler /> <!-- if you use annotation you must configure following setting --> <mvc:annotation-driven /> <!-- configure the InternalResourceViewResolver --> <bean id='internalResourceViewResolver'> <!-- 前綴 --> <property name='prefix' value='/WEB-INF/jsp/' /> <!-- 后綴 --> <property name='suffix' value='.jsp' /> </bean></beans>
4、在src下創(chuàng)建test目錄,目錄下同時創(chuàng)建MyController文件
package test;import org.springframework.stereotype.Controller;import org.springframework.web.bind.annotation.RequestMapping;@Controller@RequestMapping('/mvc')public class MyController { @RequestMapping('/hello') public String hello(){return 'hello'; }}
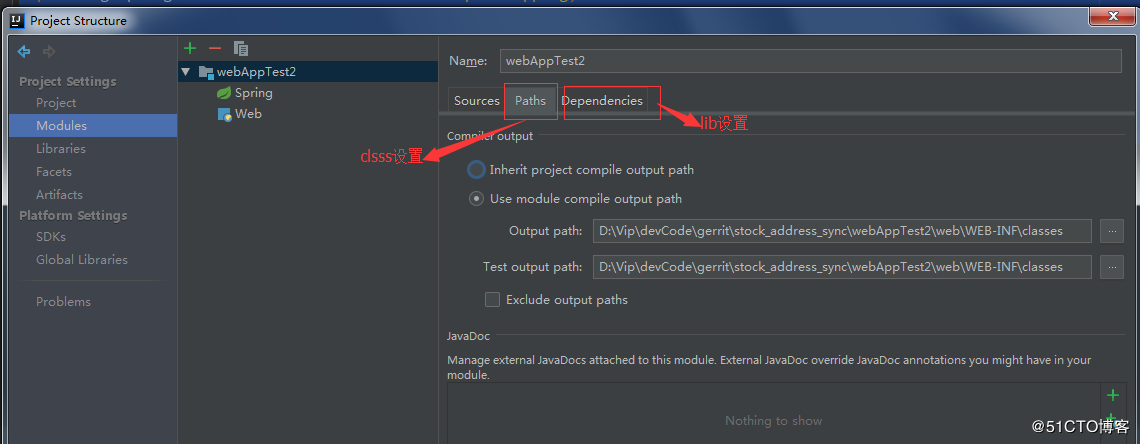
5、在web/WEB-INF下創(chuàng)建classes和lib文件夾,用來設置編譯的.class文件目錄和第三方依賴包目錄。
6、web/WEB-INF/下創(chuàng)建jsp目錄,并在目錄下創(chuàng)建hello.jsp
<%@ page contentType='text/html;charset=UTF-8' language='java' %><html><head> <title>Title</title></head><body>Hello world!!!!</body></html>
7、打war包Build-->Build Artifacts,包名webAppTest2,放到D:apache-tomcat-7.0.90webapps目錄下。
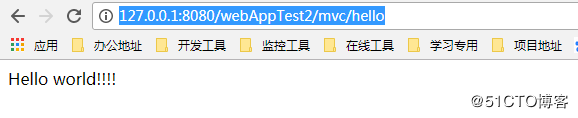
8、重啟tomcat,訪問http://127.0.0.1:8080/webAppTest2/mvc/hello 即可。
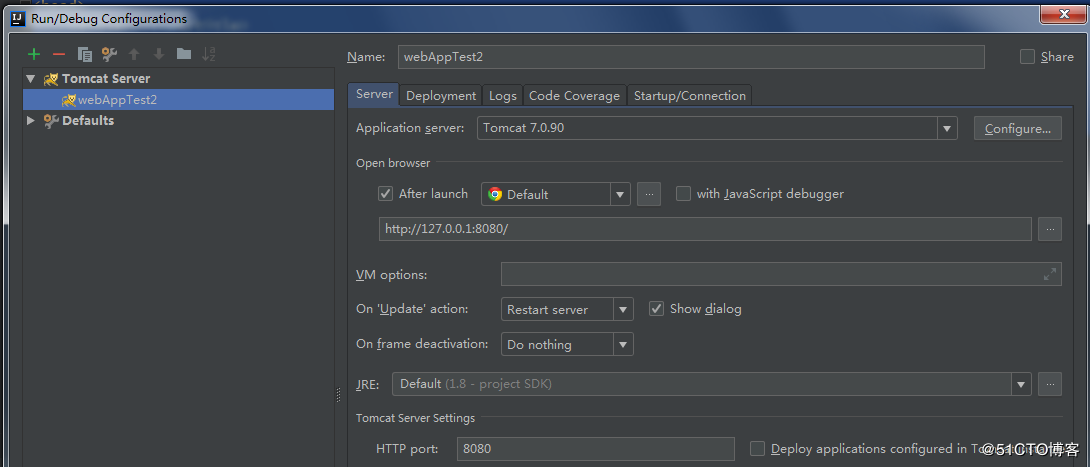
9、也可以設置Idea內(nèi)置Tomcat,直接Idea內(nèi)啟動瀏覽器

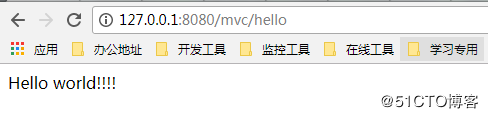
10、省略工程名,直接訪問即可
到此這篇關于Java +Tomcat + SpringMVC實現(xiàn)頁面訪問示例解析的文章就介紹到這了,更多相關Java Tomcat SpringMVC 頁面訪問內(nèi)容請搜索好吧啦網(wǎng)以前的文章或繼續(xù)瀏覽下面的相關文章希望大家以后多多支持好吧啦網(wǎng)!
相關文章:

 網(wǎng)公網(wǎng)安備