Python基于QQ郵箱實(shí)現(xiàn)SSL發(fā)送
一、QQ郵箱SSL發(fā)送
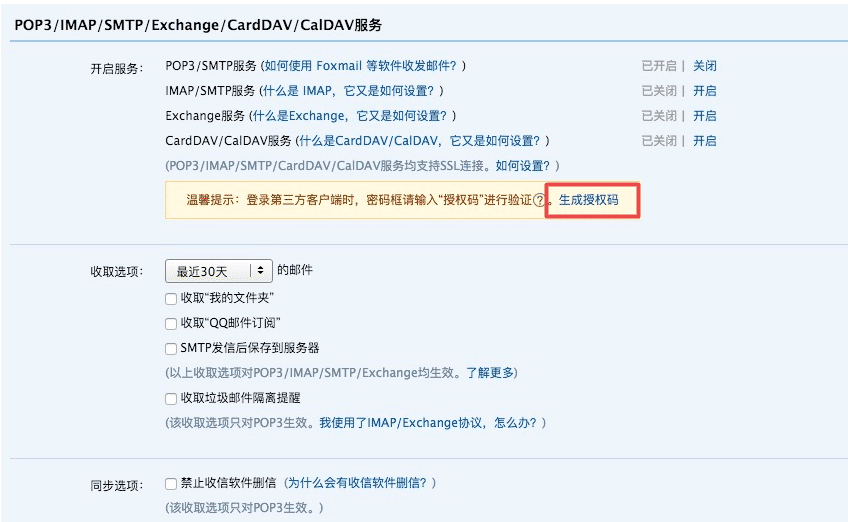
獲取qq授權(quán)碼
ssl發(fā)送方式不是使用郵箱密碼,而是需要授權(quán)碼,具體步驟如下:
登錄發(fā)送人qq郵箱>>設(shè)置>>賬戶>>POP3/STMP服務(wù)開啟>>生成授權(quán)碼
驗(yàn)證密保
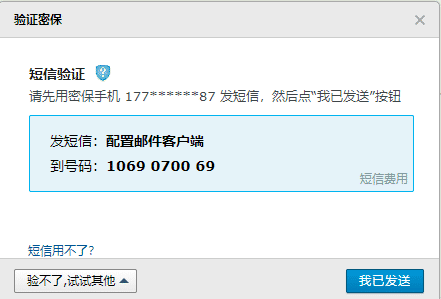
復(fù)制16位授權(quán)碼

qq郵箱發(fā)送源碼
#!/usr/bin/python3# encoding:utf-8’’’Created on 2020-04-24 12:15@author: Administrator’’’#coding:utf-8import smtplibfrom email.mime.text import MIMEText # 引入smtplib和MIMETextfrom email.mime.multipart import MIMEMultipart#設(shè)置SMTP地址host = ’smtp.qq.com’#設(shè)置發(fā)件服務(wù)器端口號,注意,這里有SSL和非SSL兩種形式,qq SSL端口為465,非SSL為端口默認(rèn)25port = '465'#設(shè)置發(fā)件郵箱sender = '357@qq.com'#設(shè)置發(fā)件郵箱的授權(quán)碼 ,qq郵箱ssl發(fā)送需要先開啟stmp并獲取密碼 pwd = ’sqmqweertyuiioplk’ #16授權(quán)碼#設(shè)置郵件接收人,發(fā)送給多人,隔開 receiver = ’yiwr@163.com,7894@qq.com’ #設(shè)置郵件抄送人,發(fā)送給多人,隔開 cc = ’ywr198592@126.com’’’’ 不帶附件發(fā)送郵件#設(shè)置html格式的郵件#body = ’<h1>這是一個python測試郵件</h1><p>test</p>’ #msg = MIMEText(body, ’html’) # 設(shè)置正文為符合郵件格式的HTML內(nèi)容#發(fā)送普通格式郵件msg = MIMEText(’Python 普通格式,郵件發(fā)送測試...’, ’plain’, ’utf-8’)’’’#需要發(fā)送附件的方法實(shí)例msg = MIMEMultipart()#設(shè)置發(fā)送頭信息msg.add_header(’subject’, ’測試郵件’) #設(shè)置郵件標(biāo)題msg.add_header(’from’, sender) # 設(shè)置發(fā)送人msg.add_header(’to’, receiver) # 設(shè)置接收人msg.add_header(’Cc’,cc) # 抄送人#設(shè)置正文內(nèi)容msg.attach(MIMEText(’Python 郵件發(fā)送測試...’, ’plain’, ’utf-8’)) #設(shè)置附件1,D://cs.txt 文件att1 = MIMEText(open(’D://cs.txt’, ’rb’).read(), ’base64’, ’utf-8’)att1.add_header(’Content-Type’, ’application/octet-stream’)# 這里的filename可以任意寫,寫什么名字,郵件中顯示附件的名字att1.add_header(’Content-Disposition’, ’attachment’, filename=’cs.txt’)msg.attach(att1) try: #注意!如果是使用非SSL端口,這里就要改為SMTP smtpObj = smtplib.SMTP_SSL(host, port) #登陸郵箱 smtpObj.login(sender, pwd) #發(fā)送郵件,注意第二個參數(shù)是發(fā)送人抄送人地址 smtpObj.sendmail(sender, receiver.split(’,’) + cc.split(’,’), msg.as_string()) print ('發(fā)送成功')except smtplib.SMTPException as e: print ('發(fā)送失敗') print(e)finally: smtpObj.quit()
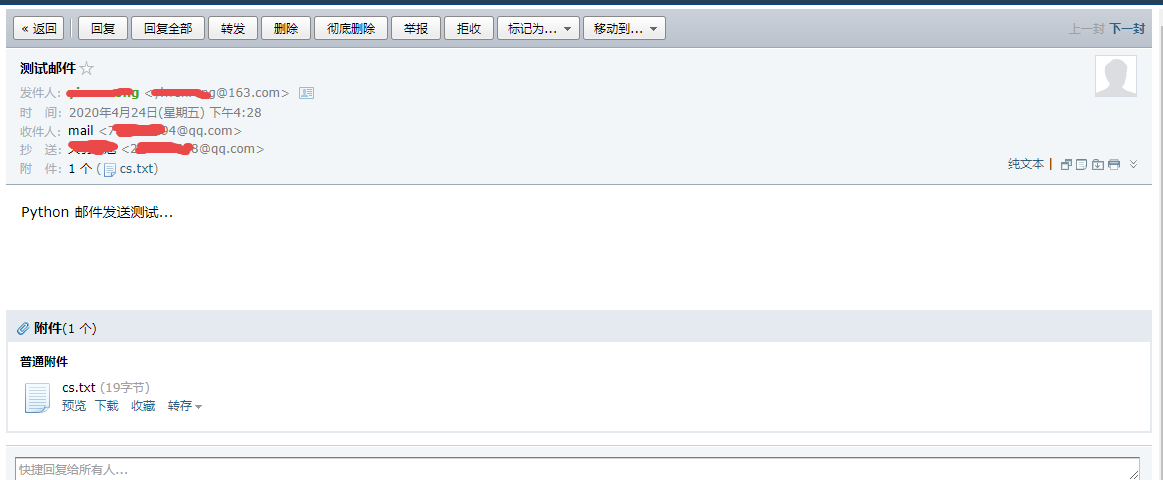
發(fā)送之后結(jié)果截圖
二、163郵箱非SSL發(fā)送
非ssl無需獲取授權(quán)碼,直接配置郵箱密碼即可
163郵箱發(fā)送源碼
#!/usr/bin/python3#encoding:utf-8’’’Created on 2020-04-24 12:15@author: Administrator’’’#coding:utf-8import smtplibfrom email.mime.text import MIMEText #引入smtplib和MIMETextfrom email.mime.multipart import MIMEMultipart #設(shè)置SMTP地址host = ’smtp.163.com’#設(shè)置發(fā)件服務(wù)器端口號。注意,這里有SSL和非SSL兩種形式,非SSL默認(rèn)端口25port = 25#設(shè)置發(fā)件郵箱sender = 'yiwr@163.com'#設(shè)置發(fā)件郵箱密碼pwd = ’xxxx’ #設(shè)置郵件接收人,發(fā)送給多人,隔開 receiver = ’7894@qq.com’ #設(shè)置郵件抄送人,發(fā)送給多人,隔開 cc = ’357@qq.com’’’’ 不帶附件發(fā)送郵件#設(shè)置html格式的郵件#body = ’<h1>這是一個python測試郵件</h1><p>test</p>’ #msg = MIMEText(body, ’html’) #設(shè)置正文為符合郵件格式的HTML內(nèi)容#發(fā)送普通格式郵件msg = MIMEText(’Python 普通格式,郵件發(fā)送測試...’, ’plain’, ’utf-8’)’’’#附件方法實(shí)例msg = MIMEMultipart()#設(shè)置頭信息msg.add_header(’subject’, ’測試郵件’) #設(shè)置郵件標(biāo)題msg.add_header(’from’, sender) #設(shè)置發(fā)送人msg.add_header(’to’, receiver) #設(shè)置接收人msg.add_header(’Cc’,cc) # 抄送人#設(shè)置正文內(nèi)容msg.attach(MIMEText(’Python 郵件發(fā)送測試...’, ’plain’, ’utf-8’)) #設(shè)置附件1,D://cs.txt 文件att1 = MIMEText(open(’D://cs.txt’, ’rb’).read(), ’base64’, ’utf-8’)att1.add_header(’Content-Type’, ’application/octet-stream’)#這里的filename可以任意寫,寫什么名字,郵件中顯示附件的名字att1.add_header(’Content-Disposition’, ’attachment’, filename=’cs.txt’)msg.attach(att1)try: #注意!如果是使用SSL端口,這里就要改為SMTP_SSL smtpObj = smtplib.SMTP(host, port) #登陸郵箱 smtpObj.login(sender, pwd) #發(fā)送郵件,注意第二個參數(shù)是發(fā)送人抄送人地址 smtpObj.sendmail(sender, receiver.split(’,’) + cc.split(’,’), msg.as_string()) print ('發(fā)送成功')except smtplib.SMTPException as e: print ('發(fā)送失敗') print(e)finally: smtpObj.quit()
發(fā)送之后結(jié)果截圖
三、問題
3.1 python通過qq郵箱,SMTP發(fā)送郵件失敗:
問題描述:使用qq賬戶及密碼SSL方式發(fā)送郵件,報錯:(535, b’Login Fail. Please enter your authorization code to login. More information in http://service.mail.qq.com/cgi-bin/help?subtype=1&&id=28&&no=1001256’)
解決方案:開啟POP3/SMTP服務(wù),獲取授權(quán)碼,qq源碼的郵箱密碼改成授權(quán)碼即可
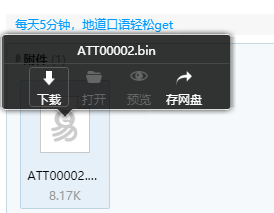
3.2 html附件變.bin文件后綴
問題描述:發(fā)送一個html格式的附件,收到郵件發(fā)送后綴變成.bin的文件,如圖:
解決方案:把 att1['Content-Disposition'] = ’attachment; filename='’ + '接口測試報告.html' 改為 att1.add_header(’Content-Disposition’, ’attachment’, filename=’接口測試報告.html’)
以上就是本文的全部內(nèi)容,希望對大家的學(xué)習(xí)有所幫助,也希望大家多多支持好吧啦網(wǎng)。
相關(guān)文章:
1. 用xslt+css讓RSS顯示的跟網(wǎng)頁一樣漂亮2. HTML5 Canvas繪制圖形從入門到精通3. 《CSS3實(shí)戰(zhàn)》筆記--漸變設(shè)計(一)4. 測試模式 - XSL教程 - 55. 讓chatgpt將html中的圖片轉(zhuǎn)為base64方法示例6. ASP.NET Core自定義中間件的方式詳解7. html5手機(jī)觸屏touch事件介紹8. CSS3實(shí)現(xiàn)動態(tài)翻牌效果 仿百度貼吧3D翻牌一次動畫特效9. JSP的Cookie在登錄中的使用10. 詳解JSP 內(nèi)置對象request常見用法
 網(wǎng)公網(wǎng)安備