Python3利用scapy局域網(wǎng)實(shí)現(xiàn)自動(dòng)多線(xiàn)程arp掃描功能
from scapy.all import *import threading二、實(shí)現(xiàn)ip掃描
1.獲取c段ip地址
在ARP()里面有ip地址,我們可以從里面提取出前3段出來(lái)
ARP().show()
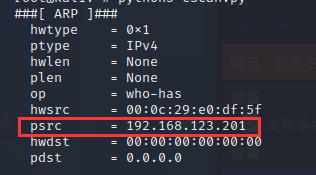
然后通過(guò)從后查找最后一個(gè).得到最后一段位數(shù),然后總長(zhǎng)度-最后一段長(zhǎng)度就能取出前3段
tip=ARP().psrcprint(tip[:(len(tip)-tip[::-1].find(’.’))])
2.arp掃描函數(shù)實(shí)現(xiàn)
然后就是建立函數(shù)實(shí)現(xiàn)掃描了,構(gòu)造arp包->發(fā)送包->判斷是否響應(yīng)->輸出信息
def ScanIp(ip):pkt=Ether(dst='ff:ff:ff:ff:ff:ff')/ARP(pdst=ip)res=srp1(pkt,timeout=10,verbose=0)if res:print(res.psrc)print(res.hwsrc)
然后來(lái)在加個(gè)判斷返回的ip跟我們要掃描的ip是否一致,然后加上異常處理
def ScanIp(ip):pkt=Ether(dst='ff:ff:ff:ff:ff:ff')/ARP(pdst=ip)try:res=srp1(pkt,timeout=10,verbose=0)if res.psrc==ip:print(res.psrc)print(res.hwsrc)except:pass
現(xiàn)在把輸出結(jié)果美化一下,不然直接print很難看
def ScanIp(ip):pkt=Ether(dst='ff:ff:ff:ff:ff:ff')/ARP(pdst=ip)try:res=srp1(pkt,timeout=10,verbose=0)if res.psrc==ip:print(’IP MAC’)print(’[+]’+res.psrc+’ ’+res.hwsrc)except:pass
嘗試調(diào)用一下
ScanIp(’192.168.123.1’)
現(xiàn)在看起來(lái)就很舒服

3.多線(xiàn)程
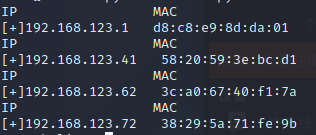
現(xiàn)在我們只需要循環(huán)一下c段ip然后用多線(xiàn)程跑起來(lái)就行了
for i in range(1,256):ip=tip+str(i)Go=threading.Thread(target=ScanIp,args=(ip,))Go.start()
然后看一下效果好像不是我們想要的因?yàn)镮P MAC輸出了很多次看起來(lái)很難受
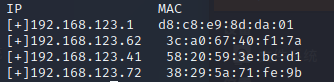
然后這里把輸出移動(dòng)到函數(shù)外的for循環(huán)上方,然后判斷一下__name__,這樣就完成了所有的功能了
from scapy.all import *import threading tip=ARP().psrctip=tip[:(len(tip)-tip[::-1].find(’.’))] def ScanIp(ip):pkt=Ether(dst='ff:ff:ff:ff:ff:ff')/ARP(pdst=ip)try:res=srp1(pkt,timeout=10,verbose=0)if res.psrc==ip:print(’[+]’+res.psrc+’ ’+res.hwsrc)except:pass if __name__==’__main__’:print(’IP MAC’)for i in range(1,256):ip=tip+str(i)Go=threading.Thread(target=ScanIp,args=(ip,))Go.start()
運(yùn)行效果
到此這篇關(guān)于Python3利用scapy局域網(wǎng)實(shí)現(xiàn)自動(dòng)多線(xiàn)程arp掃描功能的文章就介紹到這了,更多相關(guān)Python scapy實(shí)現(xiàn)arp掃描內(nèi)容請(qǐng)搜索好吧啦網(wǎng)以前的文章或繼續(xù)瀏覽下面的相關(guān)文章希望大家以后多多支持好吧啦網(wǎng)!
相關(guān)文章:
1. JavaScript數(shù)據(jù)類(lèi)型對(duì)函數(shù)式編程的影響示例解析2. vue實(shí)現(xiàn)將自己網(wǎng)站(h5鏈接)分享到微信中形成小卡片的超詳細(xì)教程3. 使用css實(shí)現(xiàn)全兼容tooltip提示框4. div的offsetLeft與style.left區(qū)別5. html清除浮動(dòng)的6種方法示例6. CSS3實(shí)例分享之多重背景的實(shí)現(xiàn)(Multiple backgrounds)7. CSS代碼檢查工具stylelint的使用方法詳解8. 不要在HTML中濫用div9. 利用CSS3新特性創(chuàng)建透明邊框三角10. 詳解CSS偽元素的妙用單標(biāo)簽之美

 網(wǎng)公網(wǎng)安備